Category Archives: Low manipulation

Easy Milkmaid Twists

Hey Maicurlies,

So today I have a styling tutorial of my Milkmaid Twists. 
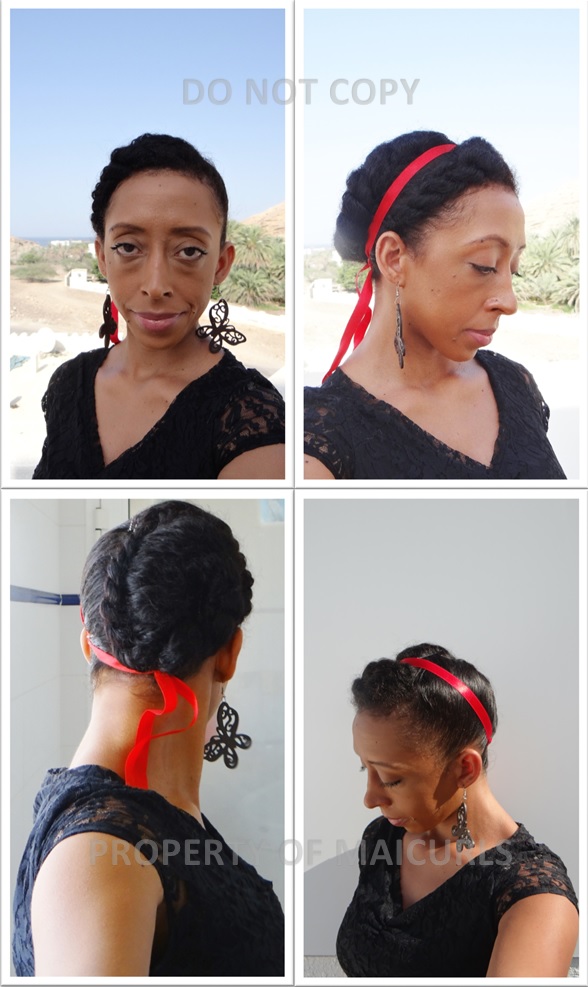
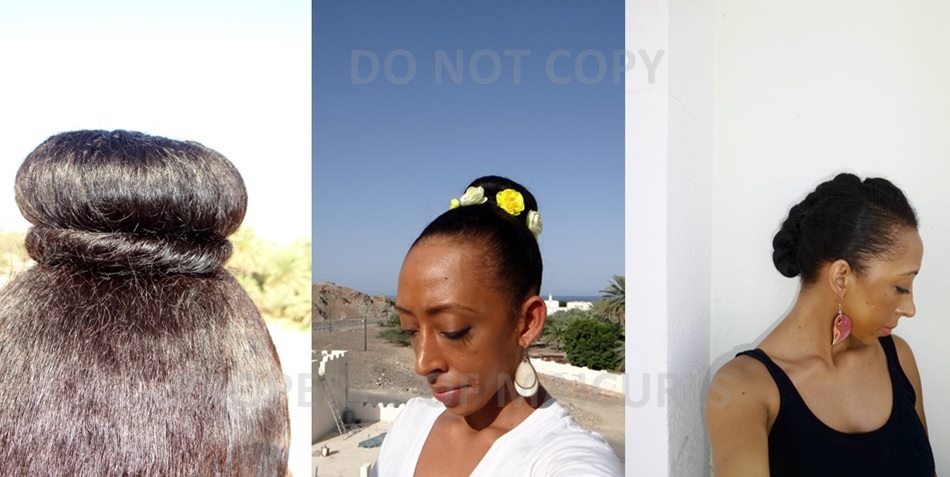
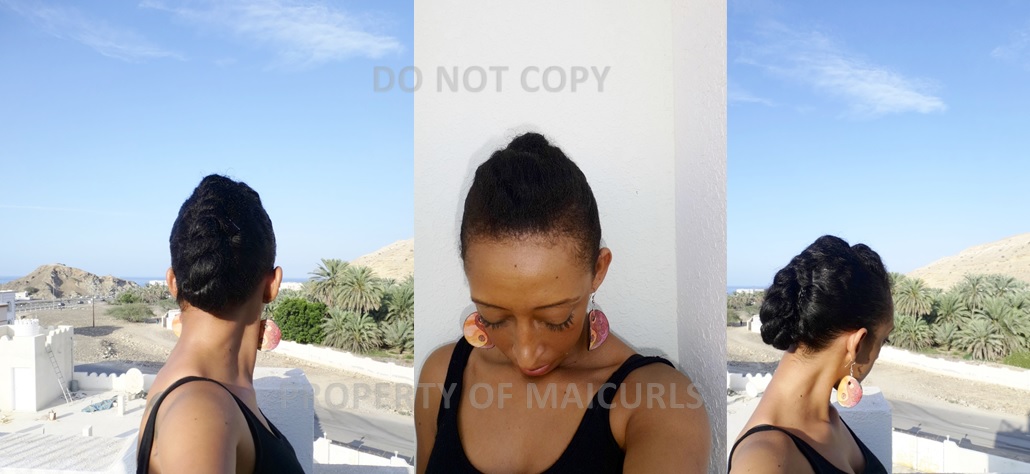
Milkmaid Twists

Milkmaid Twists

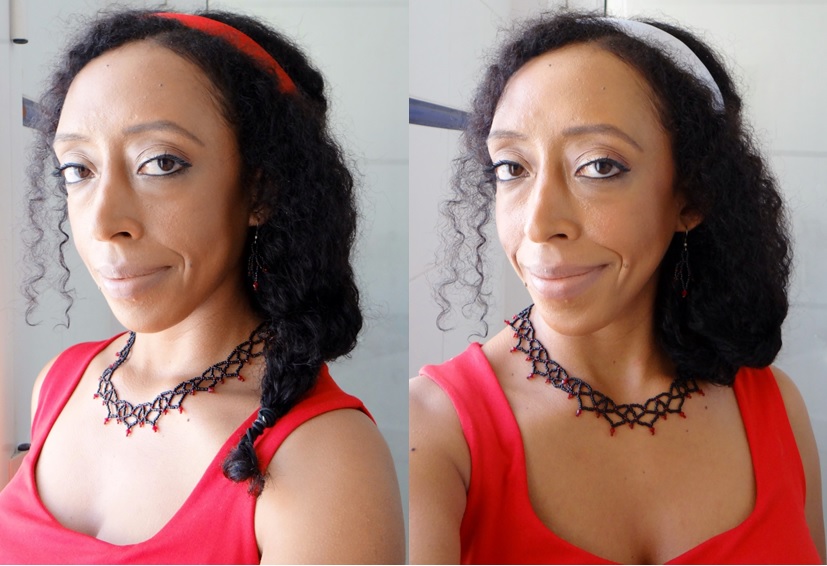
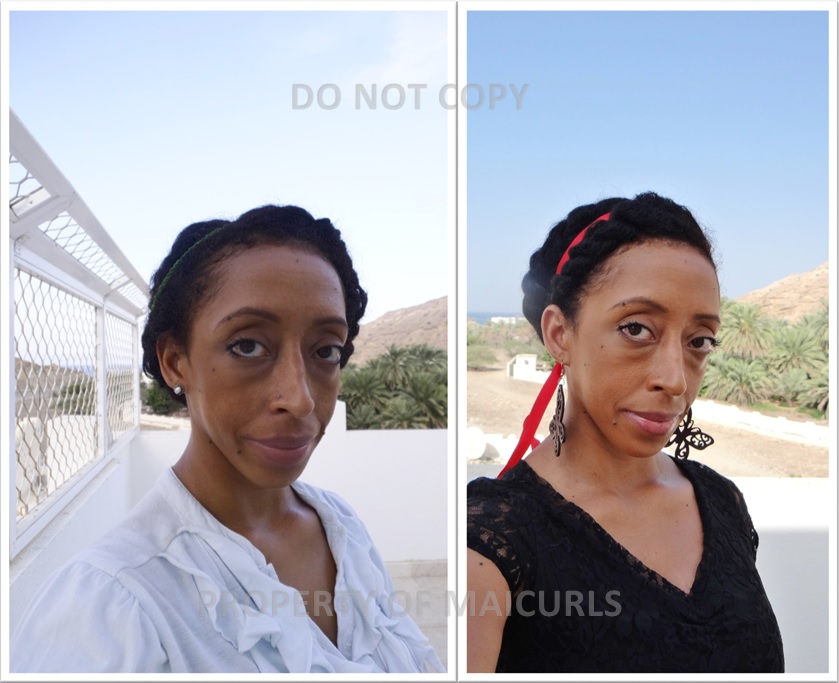
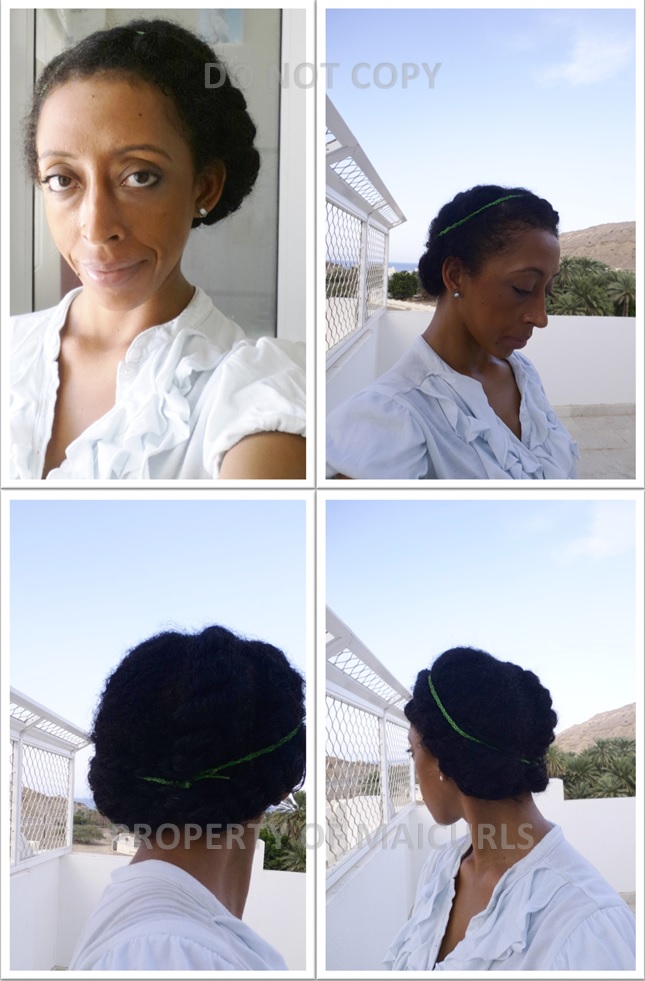
Now I will point out that I am not all that crazy about how this particular style looks on me (I love the style on others) the main reason why I don’t like it on myself that much is because my forehead and ears become quite obvious because all my hair is pulled back and away from my face LOL. I do like the fact that it is a protective/ low manipulation style since your hair is tucked away and can be left alone for days even. 

The style of  course is a breeze to do and doesn’t require too many products either. Please note: I actually recorded this video working on old, frizzy hair (that had seen better days) but even with the frizz and mess the final look still ends up looking polished and neat. The video was recorded a few months back but since I was not that big of a fan I put it away without editing it, until I was kindly requested to share the video so I did 🙂

Tools/Products used:

Method:

The first step is to split my hair in the middle in order to make two side ponytails (please note again apart from the frizz I also don’t make neat partings – I have issues). After parting, I use some FSG to help smooth out my hair and “tame” the frizz a little. I also follow up with a little of my Hair Pomade on my edges to help provide a little extra shine and thanks to the ingredients in the pomade it also helps protect and aid in the health of my edges. I use the soft bristle brush to bring my hair together and distribute the products applied. The soft bristle brush along with the gel and pomade really helps to give that “smooth” look. I pull my hair together into two side ponytails and then two strand twist each side. I then cross each twist over the top and bobby pin them on the opposite side (under the base of the twist) and tuck away the ends under the base of each twist and that is it. 

Additional:

I tend to add a wide ribbon to help accessorize the look, I like to think it makes the style look a little more “fancy” while at the same time helps me feel that I have caused some distraction away from my forehead and ears (yes I am not a fan of them!) 

Whenever I do this style I actually just take down the bobby pins, cover my hair with a scarf for the night and the next morning I touch up my edges if there is need to and then re-pin them down so I get to protect my hair for a few days. 

I have a video of course:

Would love to hear if you do Milkmaid Twists, if your method is different or if you have any suggestions for me.

Thanks

Maicurls

Maicurls

Lazy Girl Gibson Tuck (protective style)

Hey Maicurlies,

I (yet again) wanted to share a simple protective style that I seem to turn to whenever I am really not in the mood to fuss around with my hair or if my hair should be washed and I am slacking for the day (don’t judge me it happens!) 😀 

There are a number of  different ways in which I like to do the Gibson Tuck and today I wanted to share this method. 

It really is as simple and easy as it looks. 2 two strand twists on either side, 1 forward “flat twist” at the front (don’t judge my “forward flat twist” I know it is ugly LOL) and then you tuck away the rest of the hair by rolling and tucking it away under the headband. Pin back the twists and presto you are done! 

I use a headband for two reasons. 1. it acts as an accessory and 2. I use it to help tuck away the hair that isn’t twisted. 

Like I said there are several different ways in which you can do the Gibson tuck so on the day when I recorded the video 

I also took a few pictures of another versions of the style and changed up the headband (I really need to make a new headband to spruce things up). 

What do you think, Gibson tucks yay or nay? Do you have favorite Gibson tuck styles? If so let me know, I would love to hear from you! 

Thanks

Maicurls

Maicurls

2 Simple Valentines Day Styles

Hey Maicurlies,

So before I even begin to go through the process, me a minute to explain why I opted to (yet again) show you two simple styles. Ignoring the fact that doing an easy style just is my thing, sometimes overdoing our hair can just be annoying, nerve wrecking (especially if this is going to be a first date) and not to mention it can potential cause damage and/or breakage.

Ok, now that I have come up with my “explanation” (excuse) let me share the two really super easy style options 🙂 

2 Valentines Day Styles

                                                                             2 Valentines Day Styles

In all honesty it is one style – two different looks. The first starts with one chunky side twist (pictures 1 below) & is accessorized with a ribbon. The second look is also a chunky twist but I pin the end of the twist by bringing it forwards and over and use a bobby pin to hold the hair down – I pin the hair underneath (by my ear – pictures 2 below). 

What I use is: a hair bubble, bobby pins and ribbons  (you can use a head band). 

I have a video of the process and the “looks” can be done in no more than 5 minutes! They are simple yet pretty (in my opinion lol) and you don’t have to worry about curls setting, damp frizzy results etc. on Valentines day. 

If you happen to be “celebrating” Valentines Day, I hope you and your significant other have a lovely day/night 🙂 

Happy Valentines Day Maicurlies (in advance) 

Maicurls

Maicurls

Final Thoughts & Results of 6 weeks of Protective Styles & Castor Oil Challenge

Hey Maicurlies,

As you (probably) know, I was doing weekly updates of how my hair was feeling, looking and styled over the last few weeks during my Protective Style & Castor Oil challenge. You can find the updates here: Week 1, Week 2, Week 3, Week 4, Week 5, Week 6.

I just wanted to share a final summary of how I feel about the challenge as a whole, my results and future plans. I also have a video explaining how it all went on my YouTube Channel:

Castor Oil challenge results:

  • Hair remained moisturized throughout the week
  • My hair was super smooth, soft & shiny
  • I feel like my hair got a little thicker (I NEED every fiber I can get!)
  • My scalp was not itchy

Protective style challenge:

  • Less tangles
  • Less single strand knots
  • Less hand in hair syndrome
  • Less detangling time needed

Overall I am super happy with the results I got after 6 weeks.

Growth

I measured my hair before and after the challenge and while getting length was not my primary goal it was welcomed. I got some growth according to my rubbish measuring skills (I really suck at trying to measure my hair with a tape!)

Measurements

Hair Growth Measurements

                                                                               Hair Growth Measurements

On average I got 3/4 inches of growth overall, with my crown getting the least amount (1/2 an inch) and the back more growth (1 inch). So I wouldn’t say it was anything “major” but it is still growth nonetheless and I am happy.

Points for the next time:

  • I think I will do an 8 week challenge next time.
  • Will probably try doing just one style per week (hopefully I will not “get bored”)
  • Will use my Castor Oil Blend a little more on my hairline since it is so fragile and can do with a boost in thickness.

Future plans:

  •  Do more protective styles during my normal routine to keep my ends protected and knots away.
  • Continue to use my castor oil blend on my scalp and hairline with a tiny bit on the ends of my hair. (Using it on my hairline every other day maybe everyday if I can get away with it.) 
  • I will occasionally add some of my castor oil blend to my DIY Deep Conditioners
  • Add a little castor oil blend with other others as a pre-poo before cleansing with Shikakai.

If you are doing any sort of challenge for your hair be it a heat-free, colour-free, protective style challenge etc. let me know how it is going, I would love to hear from you!

Thanks

Maicurls

Maicurls


How 3 weeks of massaging my scalp and protecting my hair has gone

Hey Maicurlies,

This will just be a quick post as I already wrote about week 3 of my protective style and castor oil challenge but decided to make an update video for my YouTube Channel as well.

If you haven’t already subscribed to my channel please do! Sometimes it is easier to watch a video rather than go through all my writing 😀 and please always remember to give me feedback and suggestions…I appreciate every single comment!

Thanks

Maicurls

Maicurls

Protective Style & Castor Oil Week 3 Update

Good day Maicurlies,

I’ve reached the halfway mark of my Protective Style and Castor Oil challenge and I am still digging it!

You can read about my previous weeks here:

How did my third week go?

I must admit I sort of hit a little bump on the road in terms of how to style my hair but I figured something out in the end.

Protective Style challenge week 3

                                       Protective Style challenge week 3

I did not plan properly, washed my hair late at night on Sunday and everything just got dragged out but I managed. Similar the my previous weeks I did 2 styles (kept the styles for 3 days each) and then washed my hair at the end of the week.

The styles I did were “flat twists” (I’ve mentioned before  – flat twists and I are still trying to build a relationship) but I figured I would get to practice some more…

What Did I do?

  • To start the week I had washed, Deep Conditioned, moisturized and sealed before twisting my hair into 5  chunky twists.
  • Day 1 – After taking down the twists I massaged my Castor Oil Mix on my scalp, hairline, ends and put my hair in my first hairstyle: 3 really loose flat twists (one on either side of my head and one in the middle). I accessorized with different ribbons over the 3 days…to distract people from my not to neat flat twists.
First style - 3 loose flat twists and accessories (this was the last day before I changed the style).

First style – 3 loose flat twists and accessories (this was the last day before I changed the style).

Second style - One big flat twist (on the right) pinned down and a two strand twist pinned back.

Second style – One big flat twist (on the right) pinned down and a two strand twist pinned back.

  • Day 6 – I took down the flat twist at night, massaged my scalp, hairline and ends with the Castor Oil mix and pineappled my hair to sleep.
  • Day 7 – Wash day routine and then got my hair ready to be set for week 4.

Castor Oil Challenge:

 I used the oil 4 times and think I might stick with just applying it 4 times. I do not think my hair will be happy with me if it is coated even though I have diluted the Castor Oil…I know my limits :D.  I have my recipe and a video of the mixing process here.

Again my hair felt great throughout the week: moisturized, soft, smooth, less tangles and shine galore! While I am not really looking to “grow out” my hair, I will admit that I am interested to see how much length I retained/gained at the end of the challenge.

Week 4 here I come!

Maicurls

Maicurls

Protective Style & Castor Oil Week 2 Update

Good evening Maicurlies!

Protective style challenge week 2

Protective style challenge week 2

It has been two weeks since I started my Protective Style & Castor Oil challenge and let me tell you, I am LOVING it!

Protective style update:

In all honesty I have always been a fan of wearing my hair out….”FREE” because it is so much easier for me to do a simple twist-out or braid-out, but I am appreciating this challenge. Is it a little difficult for me to come up with styles to wear? Yes. I have said this before and will continue to say this: I am NOT a styling guru and I am not “creative” in terms of unique styles however, I do what I know/can.

How did my second week go?

Similar to week 1, I enjoyed the fact that I didn’t have to “mess” with my hair too much, especially in the morning before work. I would lightly touch up my edges and be on my way. As always I slept with my scarf around my head at night and that sort of helped with the fly-aways. My hair felt really moisturized, soft and looked shiny (LOVE). I only moisturized and sealed my hair once during the week and felt that a light moisturizer (my DIY Spray Leave-In) was sufficient. I also noticed that I had less tangles than I normally would by the end of the week (winning!) I did two styles for the my Twist and Tuck Donut Bun (days 1 – 3) and my new Pinned up “Flat twist” AKA Seahorse (I shall explain below).

What Did I do?

  • To start the week I had washed, Deep Conditioned, moisturized and sealed before twisting my hair into 5  chunky twists.
  • Day 1 – After taking down the twists I massaged my Castor Oil Mix on my scalp, hairline and used a dab on my ends. I put my hair in my first hairstyle: Twist and Tuck Donut Bun.
  • Day 3 – I reapplied my Castor Oil mix to my scalp, hairline, ends and decided to accessorize the Bun with my DIY floral hairband.
Twist and tuck donut bun

Twist and Tuck Donut Bun (added accessory)

  • Day 4 – I moisturized my hair with my DIY Spray Leave-In Conditioner and sealed  with Almond Oil. I then put my hair into my second hair style the (Pinned up “Flat twist”) that I kept for the remainder of the week. I don’t know if people would call it a flat twist because to me it looked like a seahorse before pinning. Side note*: Flat twists and I do not get along at all! I suck at them but I did try and so far this is the best I have ever done!
Pinned up flat twist

Pinned up flat twist

This is the seahorse “flat twist” before I used one bobby pin to tuck away the ends

Flat twist aka Seahorse

“Flat Twist” aka Seahorse

  • Day 6 – I took down the flat twist, massaged my scalp, hairline and ends with the Castor Oil mix and redid the flat twist again.
  • Day 7 – Wash day routine and then got my hair ready to be set for week 3 (this week).

Castor Oil Challenge:

 I used the oil 3 times last week and actually want to increase it to 4 times. Eventually I might  even increase it (but we shall see I don’t want to push it). I was always worried that my hair would be greasy and my scalp/pores clogged up but the mixed blend of Castor with Rose Infused Grapeseed Oil seems to be working out great. I have my recipe and a video of the mixing process here.

My hair did not feel dry at any point during the week. I did re-moisturize my hair mid week just because that has been my habit but I only used my light leave-in so there was no worry of product build up, plus moisturizing is always a good idea. My roots felt so super soft, the ends were smooth and I think the Castor oil blend helped to avoid extra tangles. My individual strands basically glided across each other instead of wrapping, trapping and clinging onto one another. Overall I am loving this challenge!

Here’s to week 3!

What do you think of my Protective challenge styles? Do you like my Castor oil blend? I would love to hear how you use castor oil.

Thanks

Maicurls

Maicurls