Category Archives: Natural Hair Styles

Revlon Realistic Wash-n-Go (Black Seed Oil Product Line)

Hey Maicurlies,

Today I am sharing my Wash-n-Go results, using the Revlon Realistic Black Seed Oil Product line.

If you haven’t read my “First Impression” on the Revlon Realistic Product box I was sent through Brown Girl Bloggers, please take a look at it as I delve into each product from the line in details (providing information on scent, texture/consistency and ingredients).


Wash-N-Go Process

My Wash-n-Go started with my wash day process where I first used the Strengthen Shampoo:

Photo Credit Revlon Realistic USA

Photo credit Revlon Realistic USA

1. Cleansing Using about 4-5 pumps of the shampoo after damping my hair with water (I wash my hair in sections) I focused on my roots and scalp first in order to remove product buildup, sweat, dirt etc. Using my finger tips I gently massaged my scalp and worked the shampoo. I also used my scalp massage brush to help lift product buildup and sweat from my scalp. I added another 3 pumps of shampoo onto my roots and scalp before working the shampoo on the length of my hair. It smells divine and had a little bit of slip to help detangle (however, I did not necessarily focus on detangling while using the shampoo that came later). I have always had a hate hate relationship with shampoo because from past experience they have ALWAYS left my hair feeling dry and stripped. However, this shampoo did neither! It lathered up a little bit and left my hair feel clean without stripped of natural oils produced by the scalp. It basically left my scalp and hair feeling clean without that typical “squeaky clean” feeling I have experienced in the past. In terms of shampoos, this definitely has been one of the best I have personally used.

Photo Credit Revlon Realistic USA

Photo credit Revlon Realistic USA

2. Conditioning: After shampoo-ing I moved onto their Strengthening Conditioner (Intense Moisture). I struggled getting the conditioner out of the pump because it is really really thick which, is something I had anticipated when I did my initial review of the box (check my previous post).  I ended up removing the pump and just squeezed the conditioner out of the container. I worked the conditioner from ends to roots since the ends of our hair is the oldest and driest parts so I focus on that first. I am very heavy handed with conditioner because this is when I really finger detangle and remove shed hair (using my fingers as a comb – I no longer use a comb while washing my hair). This conditioner melted into my hair, despite being really really thick. I had anticipated that it would sit on my hair but I was proven wrong! It basically dissolved. My curls were left detangled, soft, moisturized and clumped together.  I absolutely loved how hydrated my hair felt after using the conditioner. I was left with a normal amount of shed hair (for me) as I would on any other wash day. I left the conditioner on with a shower cap for 10 minutes (as per their instructions) and then rinsed it out.

Photo Credit Revlon Realistic USA

Photo credit Revlon Realistic USA

3. Moisturizing For the Wash-n-Go process I first moisturized my hair with their Strengthening Butter Creme Leave-in Conditioner. This is the thickest Leave-in Conditioner I have ever applied on my hair! I was actually a little worried that it might just coat my strands because of the thick consistency of the product, especially since I have fine strands. I also wasn’t sure if my curls would be weighed down due to the product just sitting on top of the strands instead of being absorbed but I yet again was proven wrong! My hair literally drank up the Leave-in! It did’t sit on top of my hair, it practically melted into int nor did it leave it feeling greasy in any way. I really put it to the test by applying A LOT of Leave-In. It smells amazing and left my curls moisturized, soft, shiny, hydrated and clumped together. After applying the leave-in is when I go for my wide tooth comb to make sure I have gotten rid of all tangles and shed hair (my comb was free of shed hair at this point).

Photo Credit Revlon Realistic USA

Photo credit Revlon Realistic USA

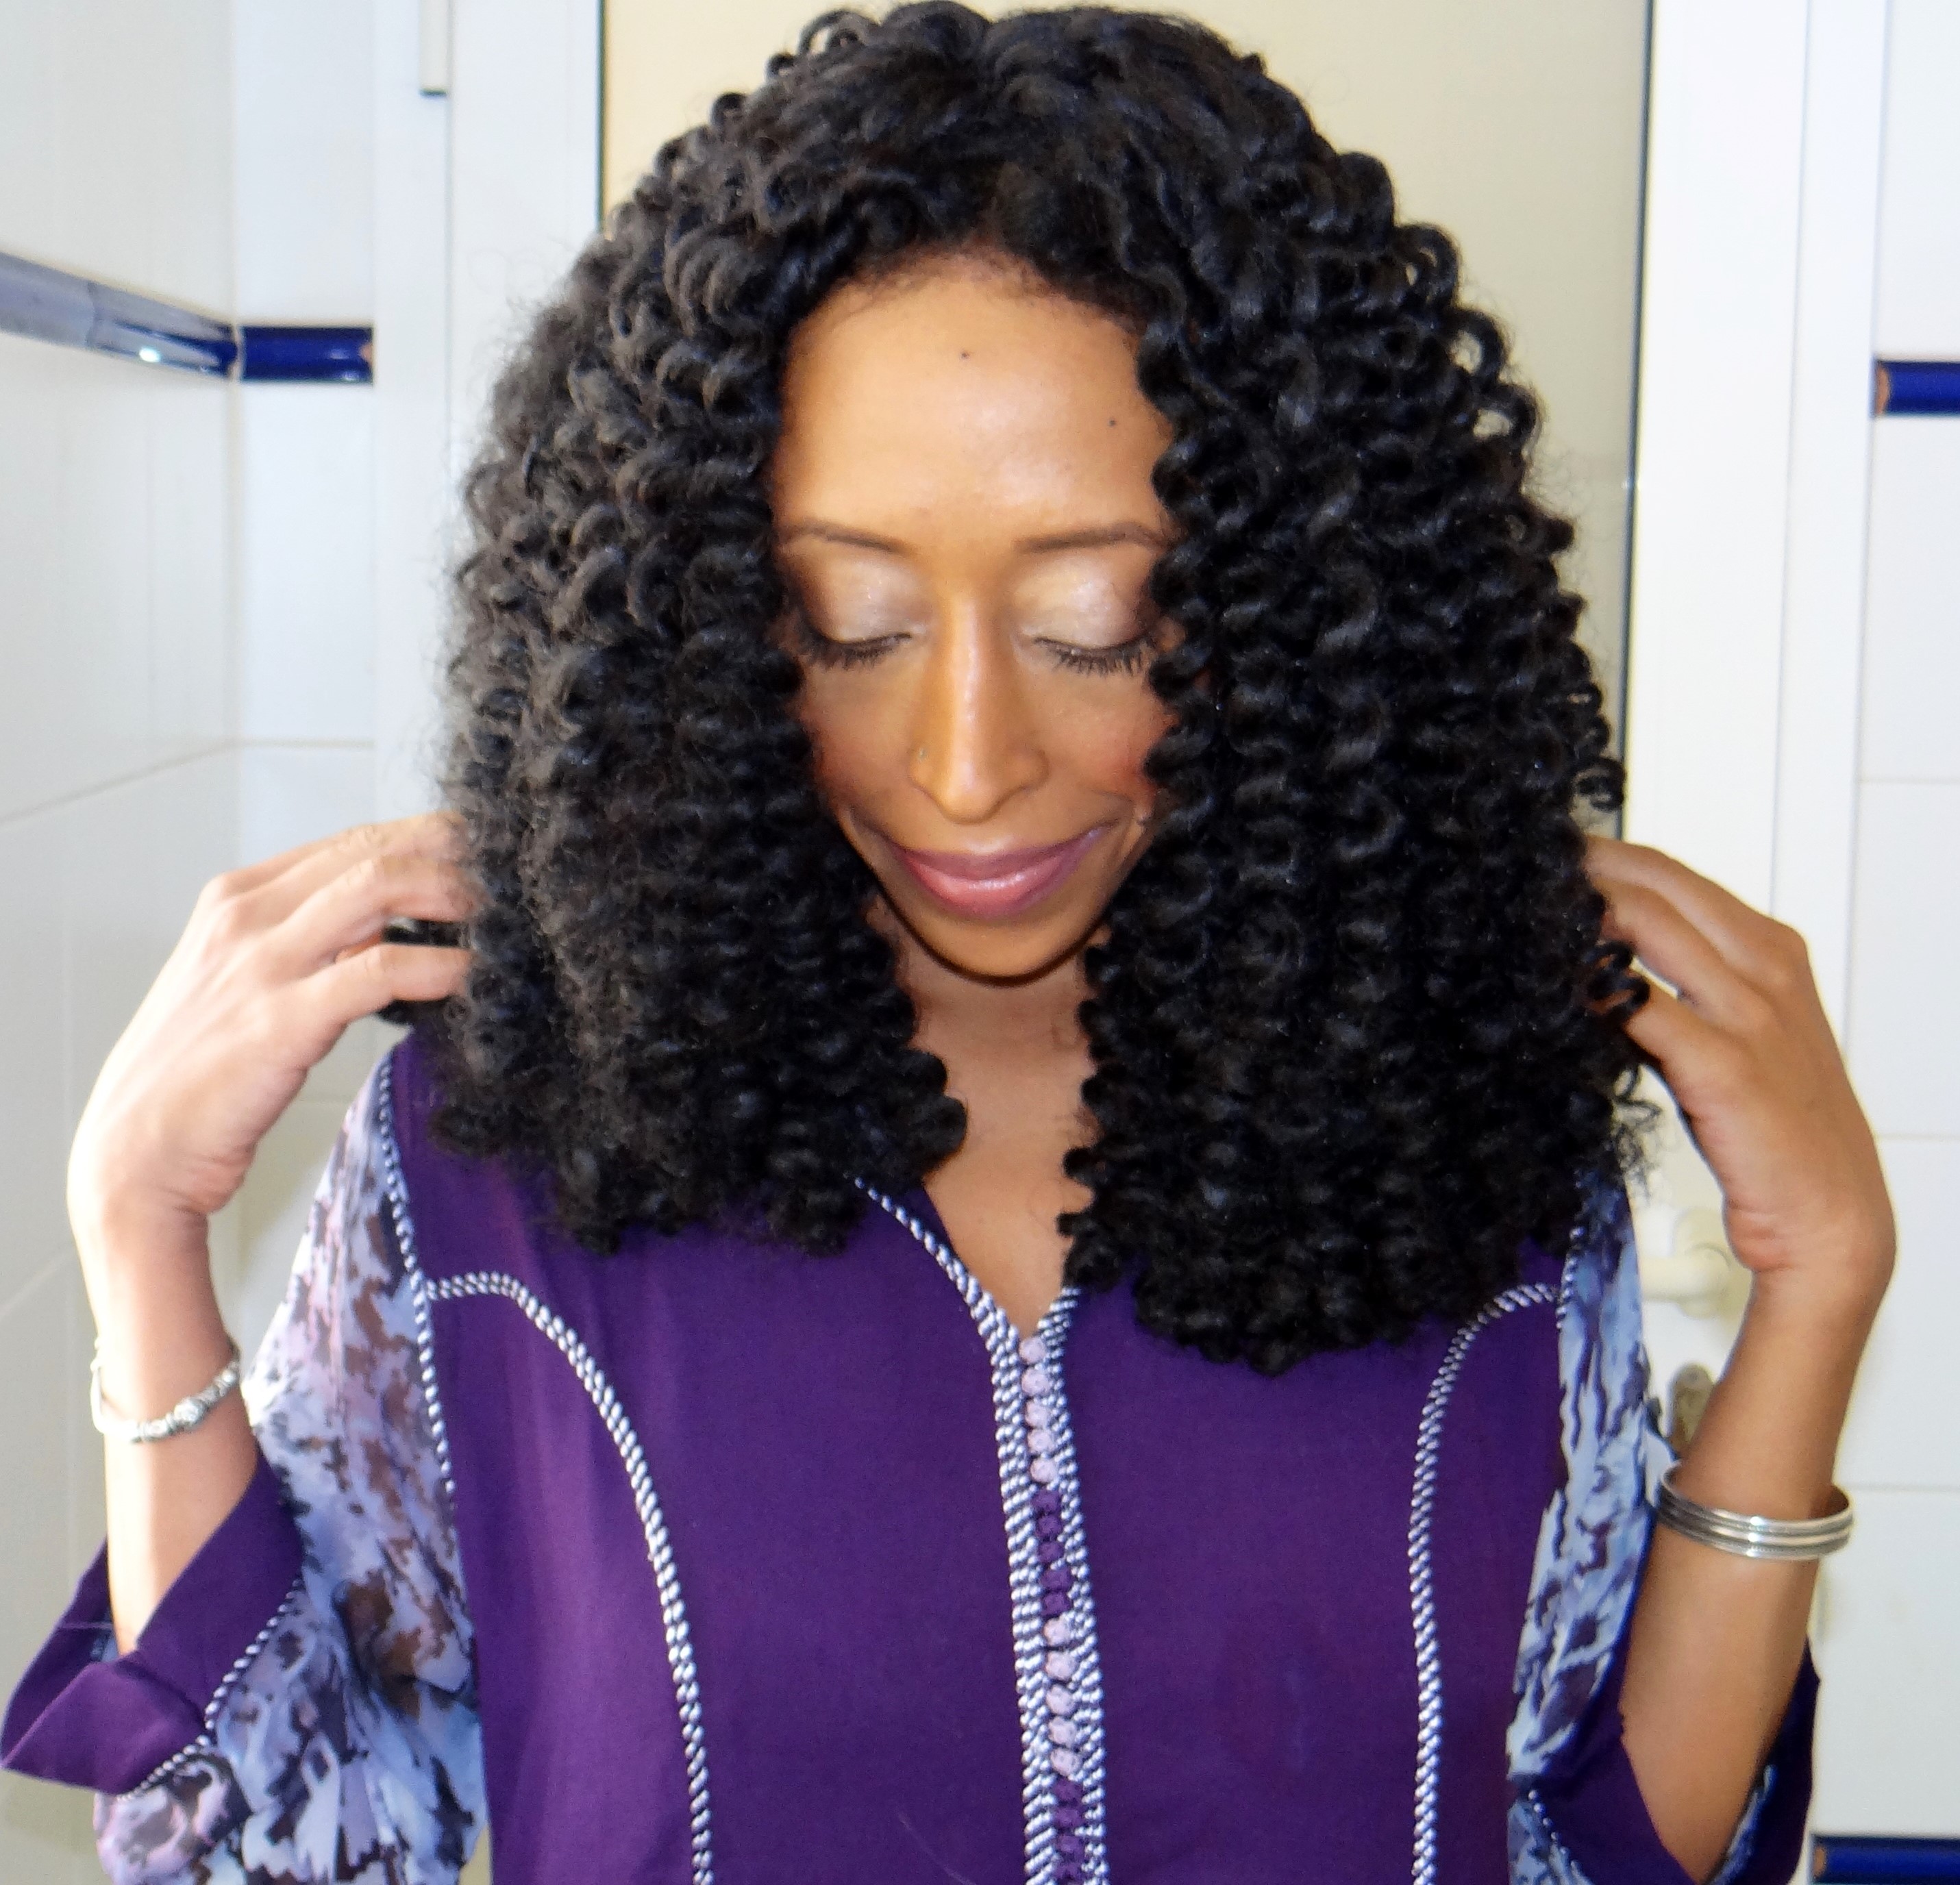
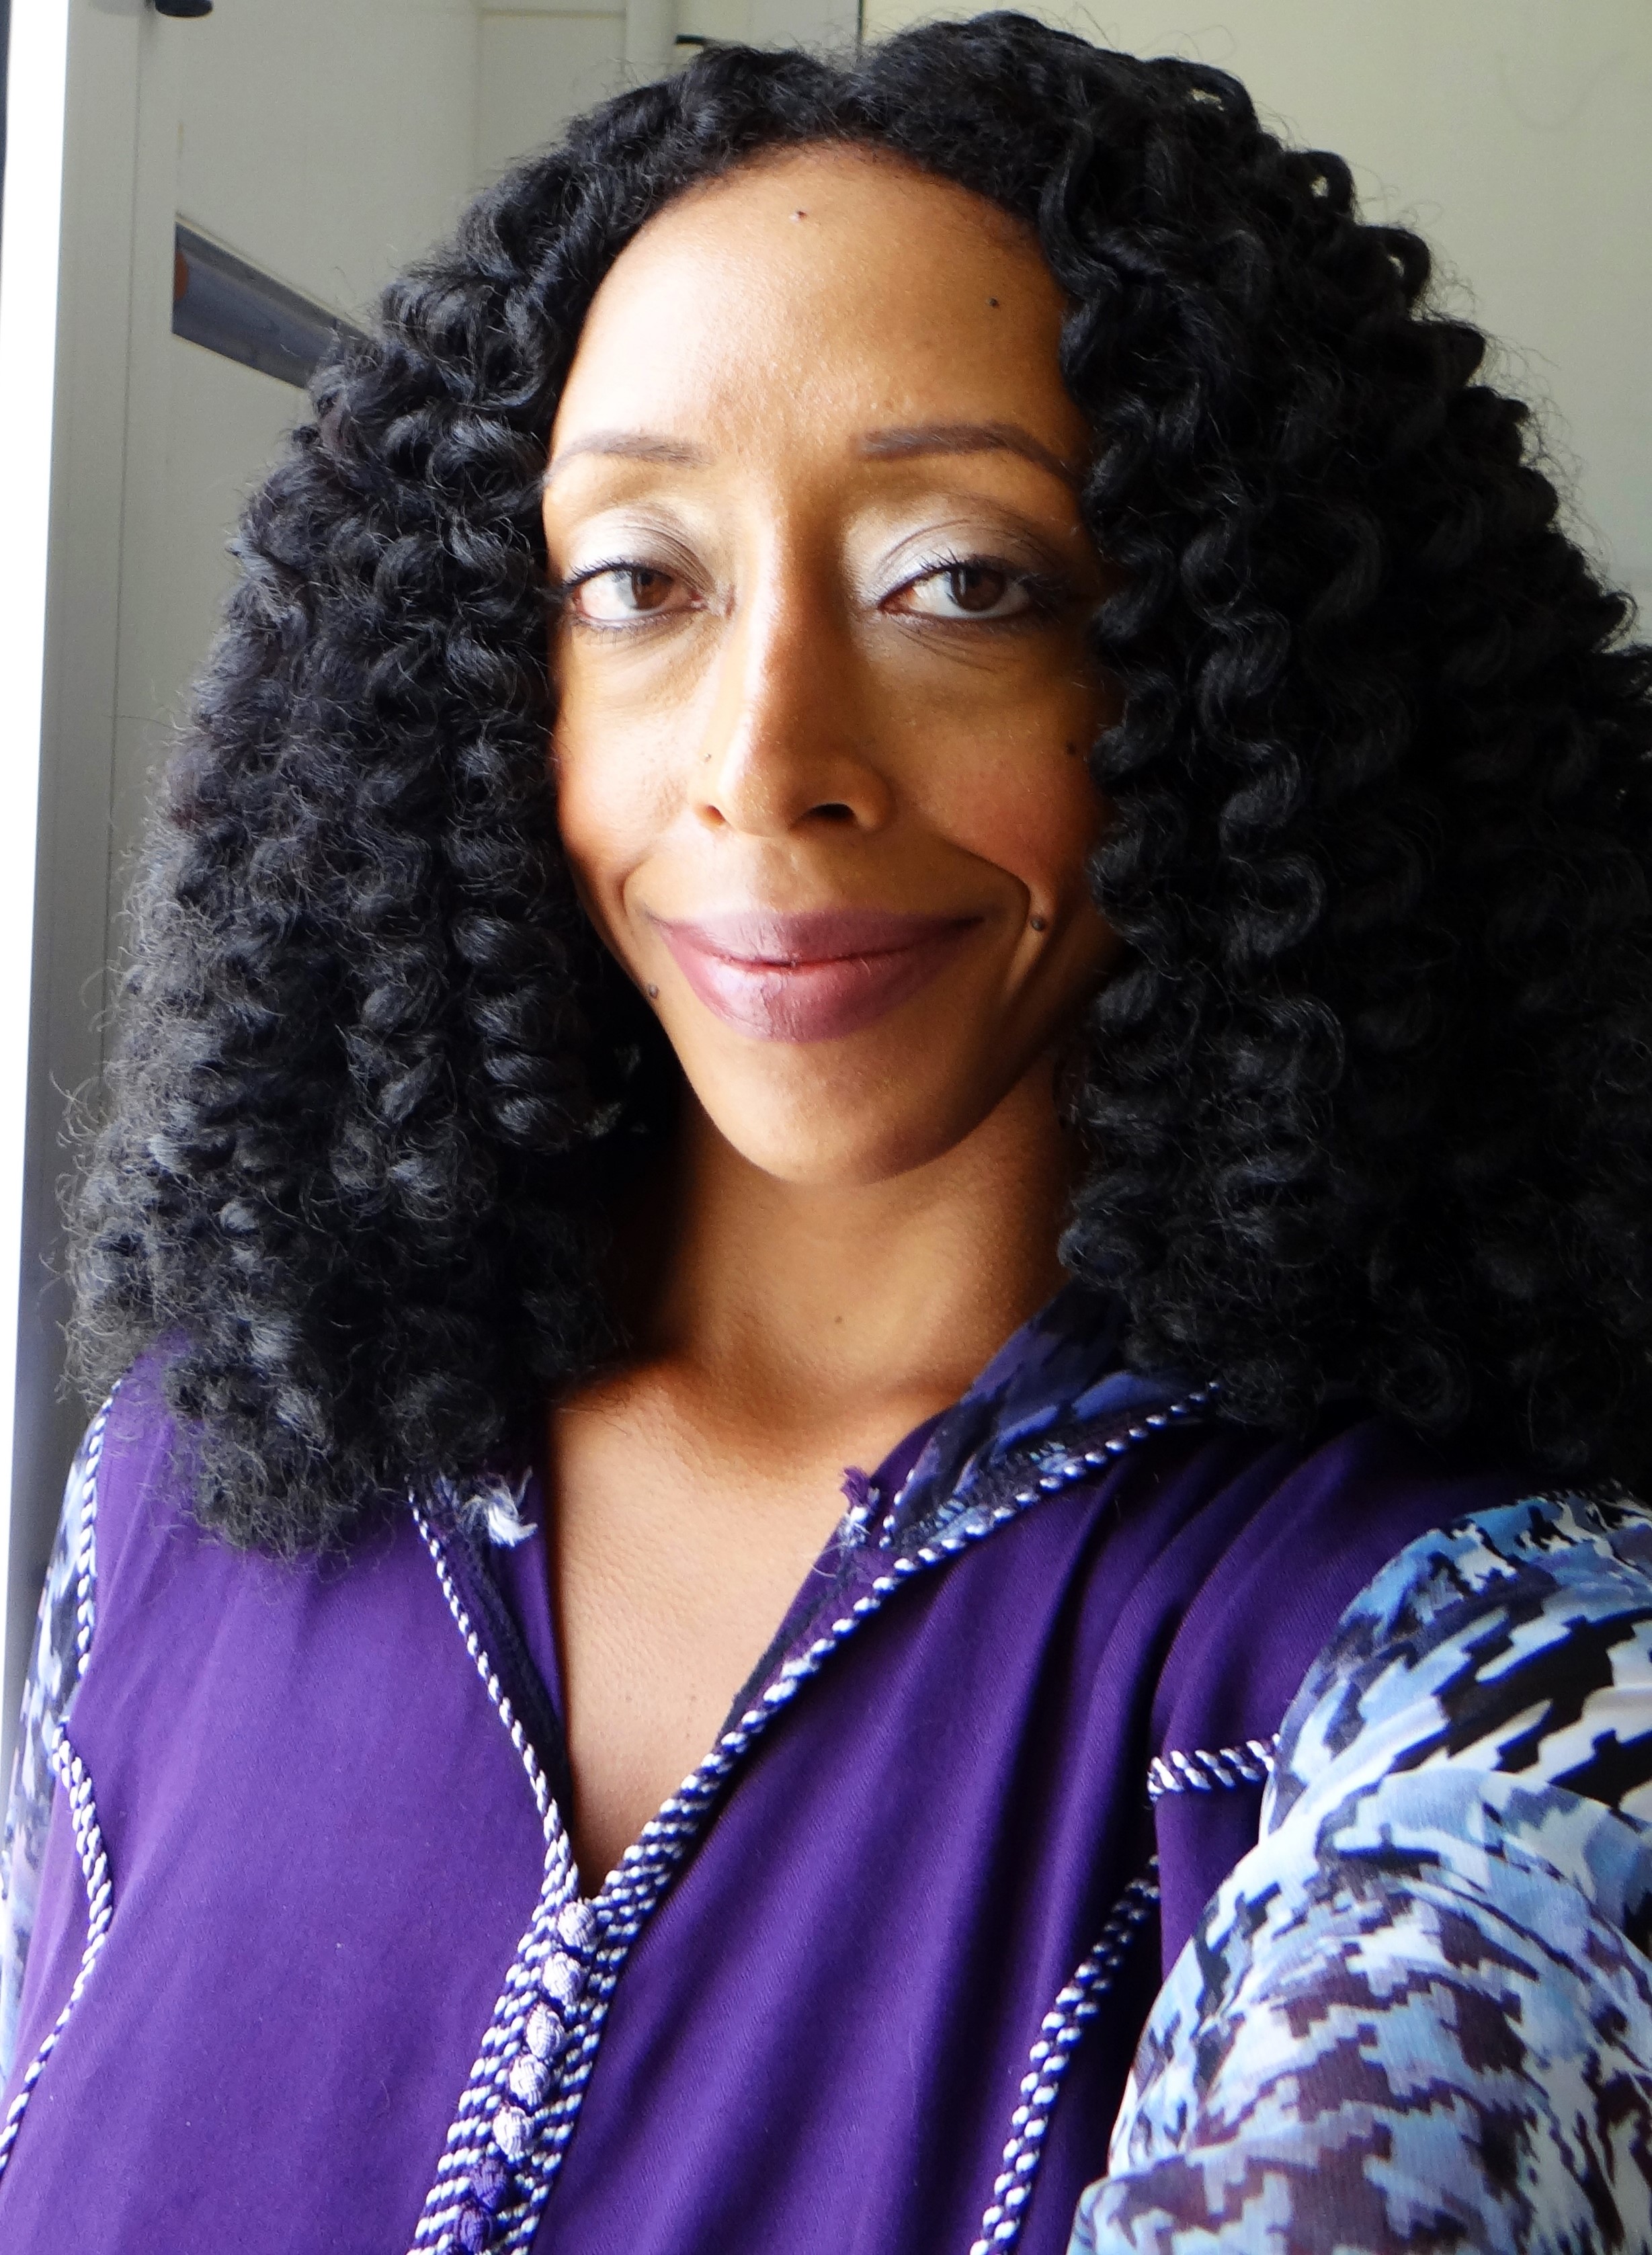
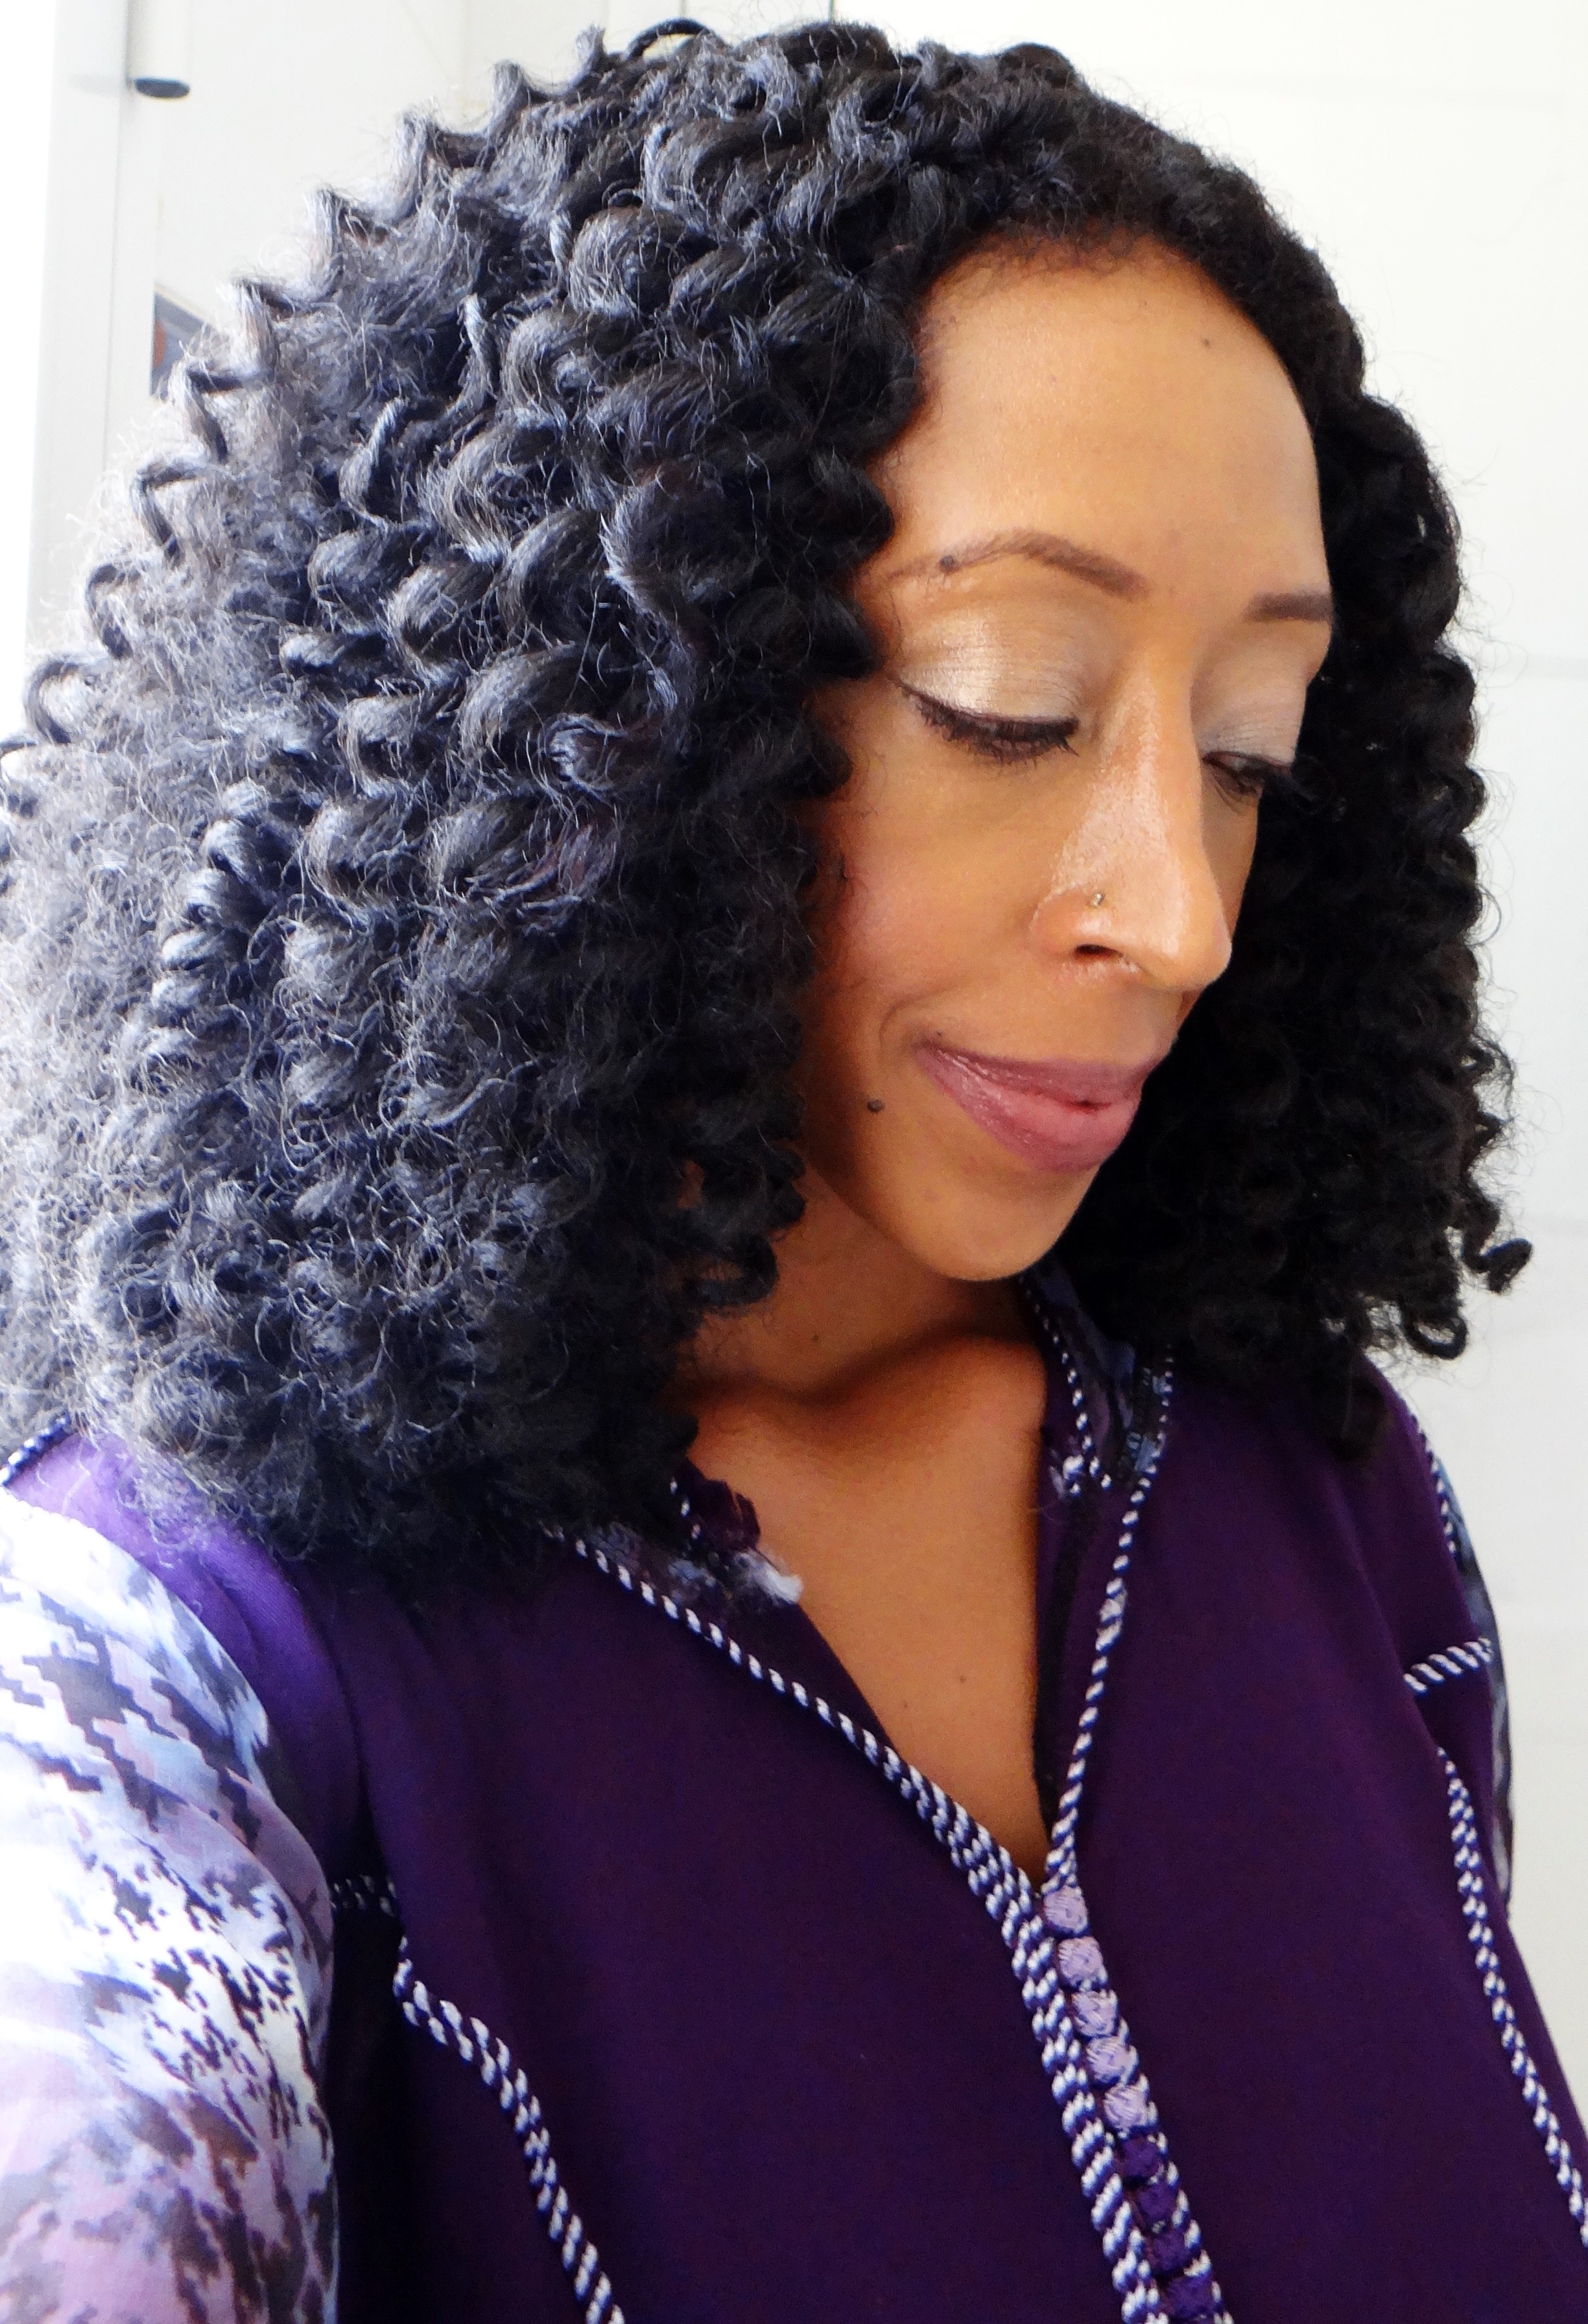
4. Defining: To define my Wash-n-Go I used the Strengthening Curling Custard. This is another product that is thick in consistency however, it has more of a cream texture compared to the Leave-In. This product helped to enhance my curls, clumped each strand and also left my hair smelling amazing and looking shiny. It didn’t leave it feeling coated nor did I have a “crunchy” after effect on my curls. I was left with fluffy, frizz free, bouncy hair that had body, movement and definition. 
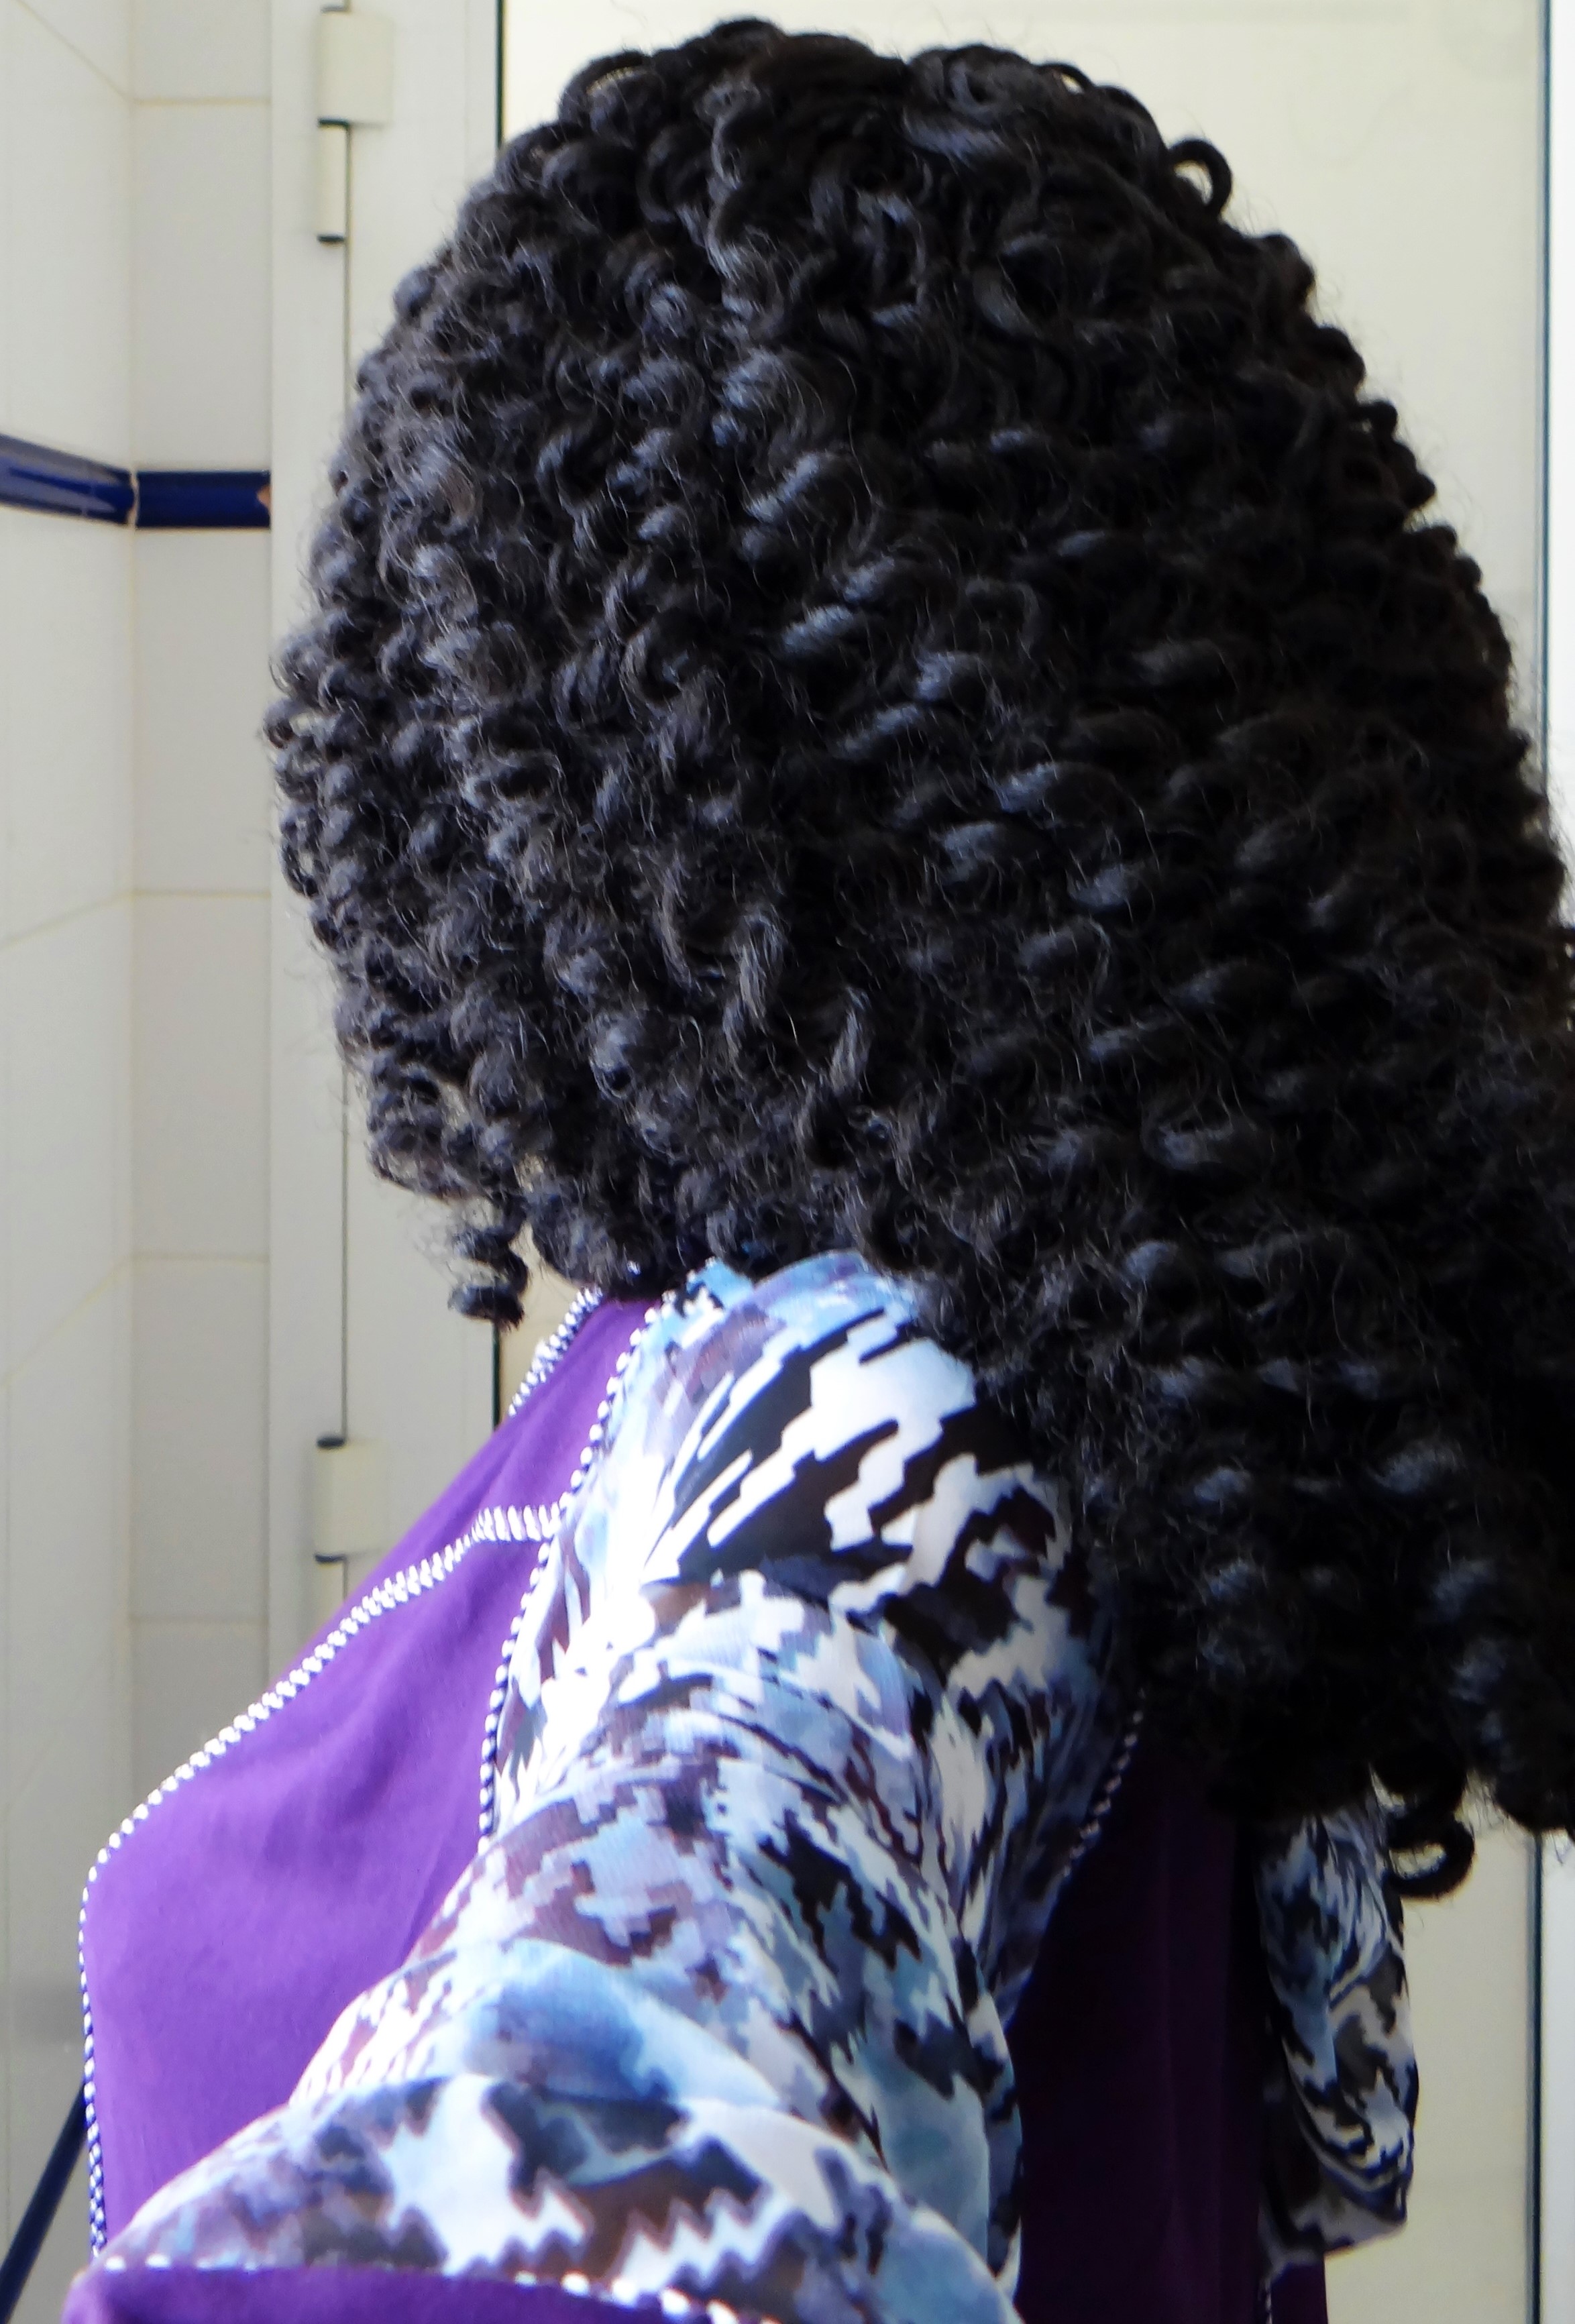
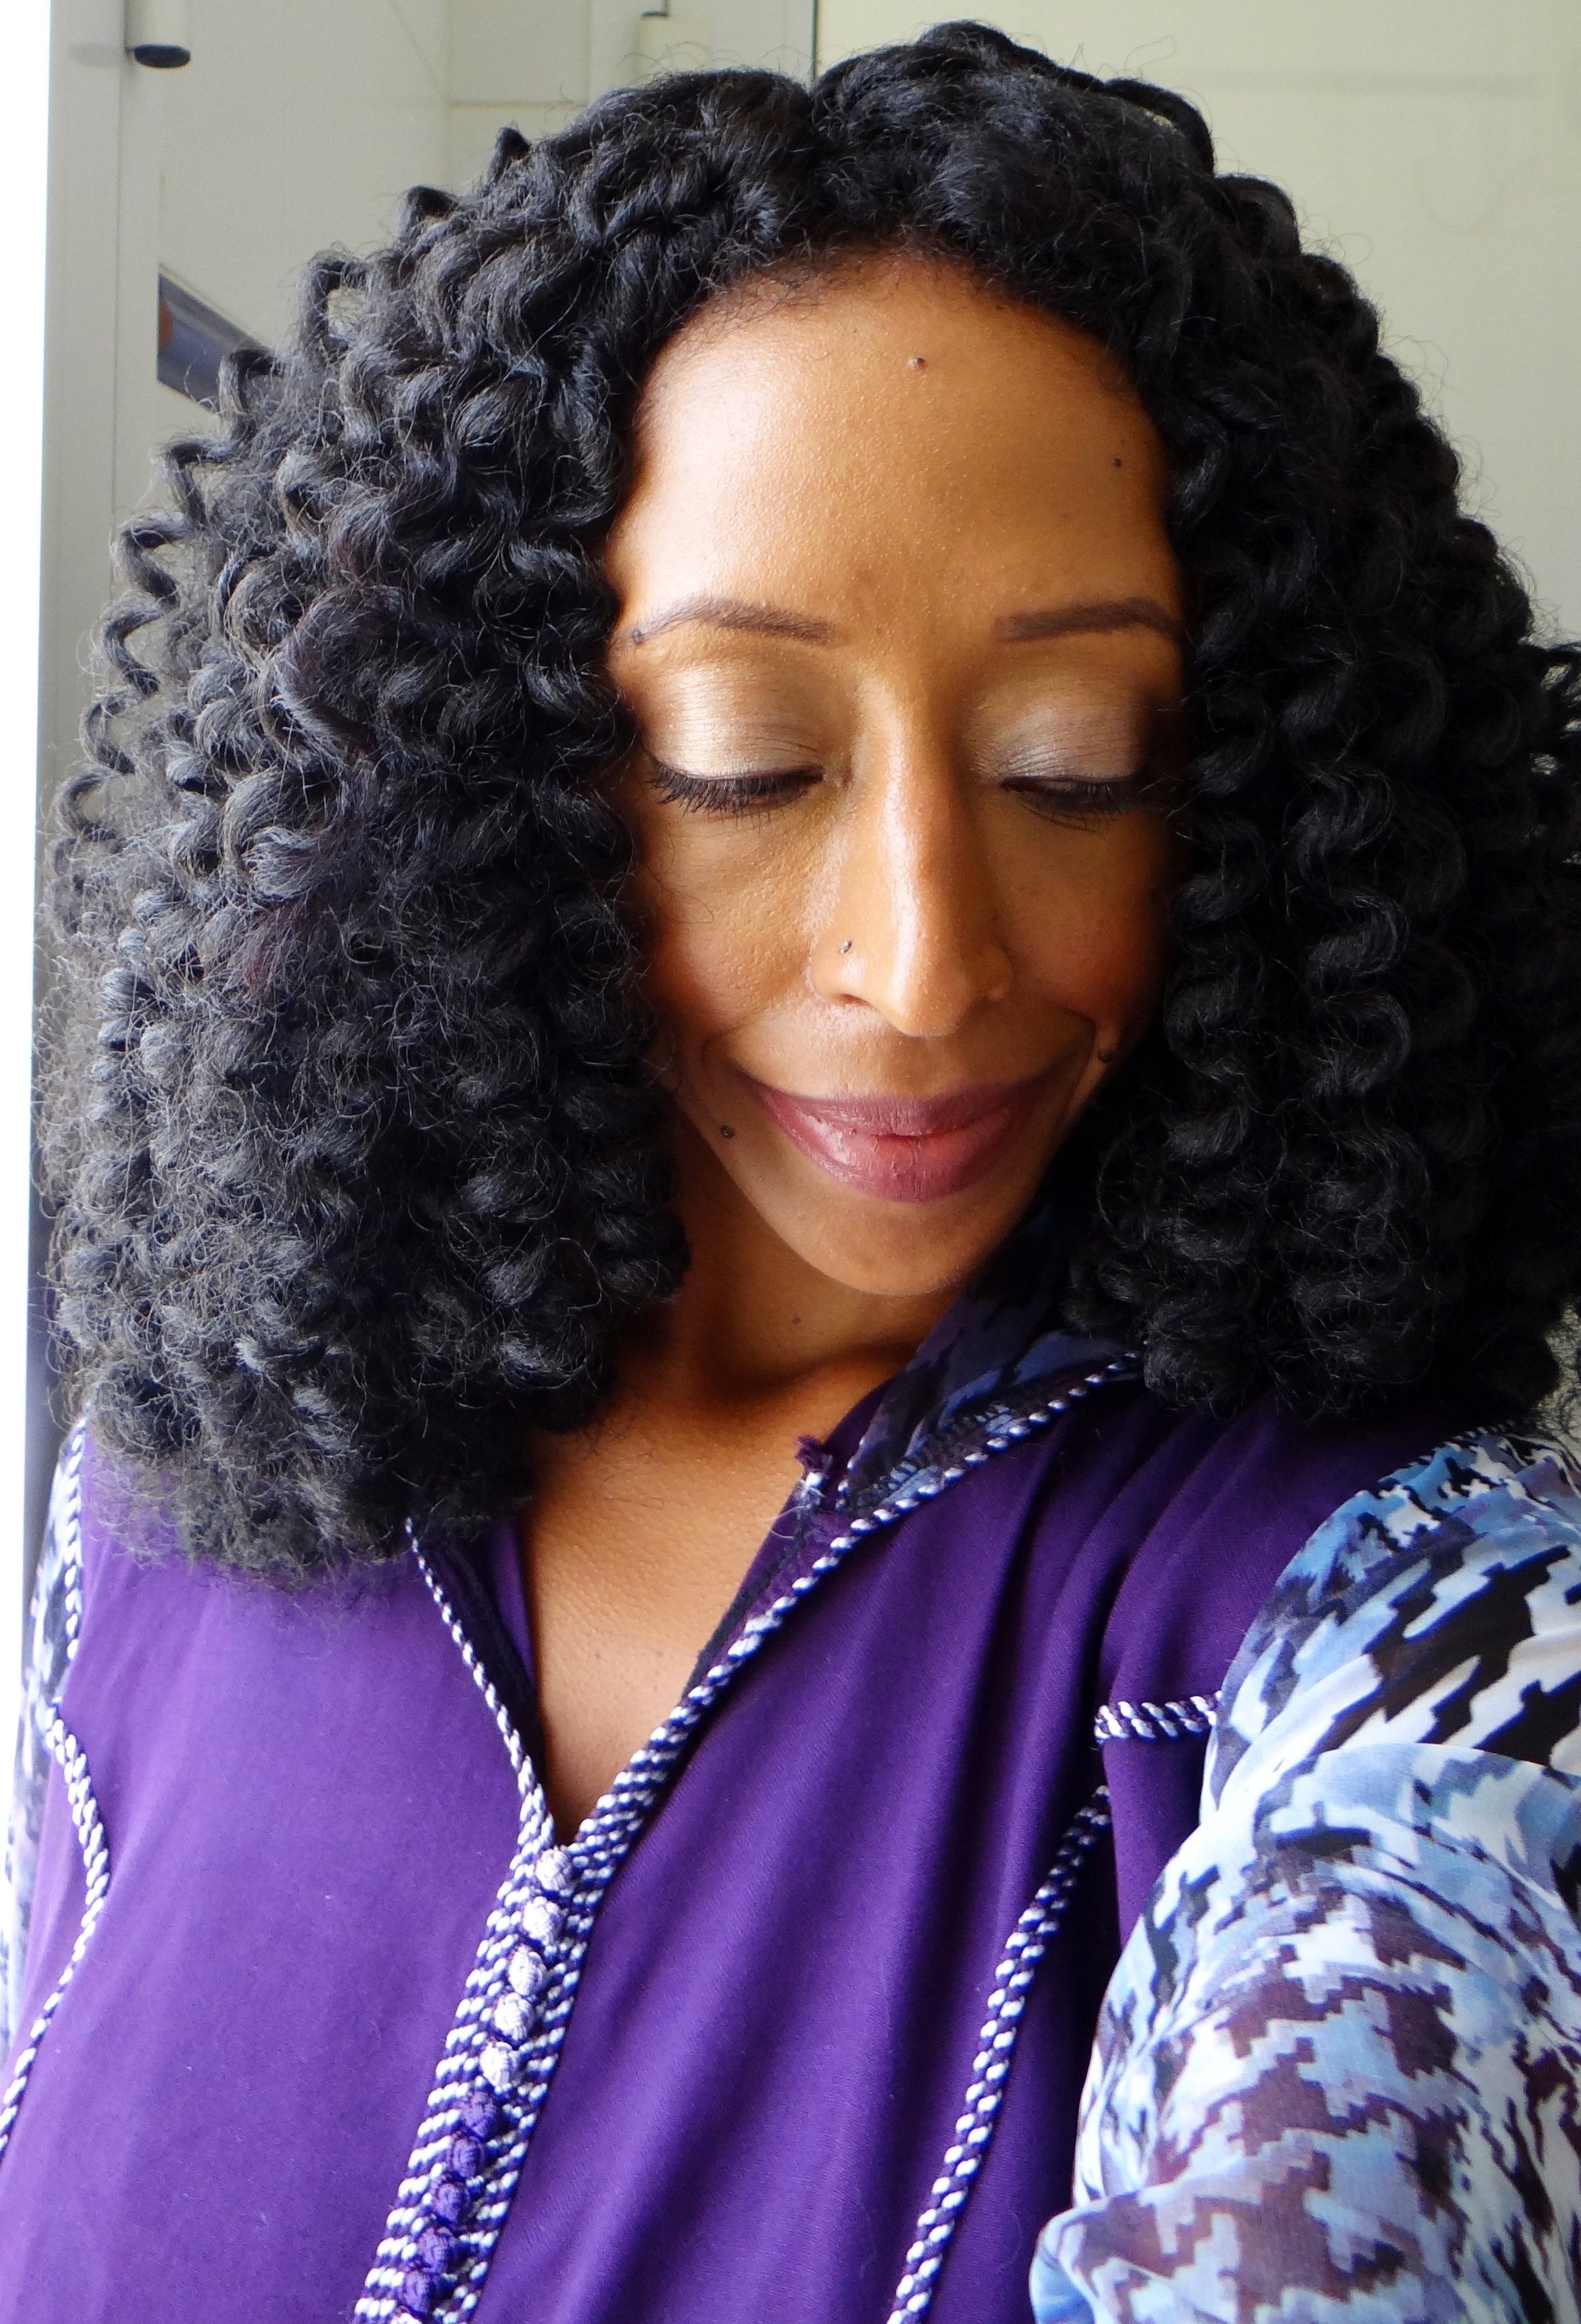
Final Verdict:

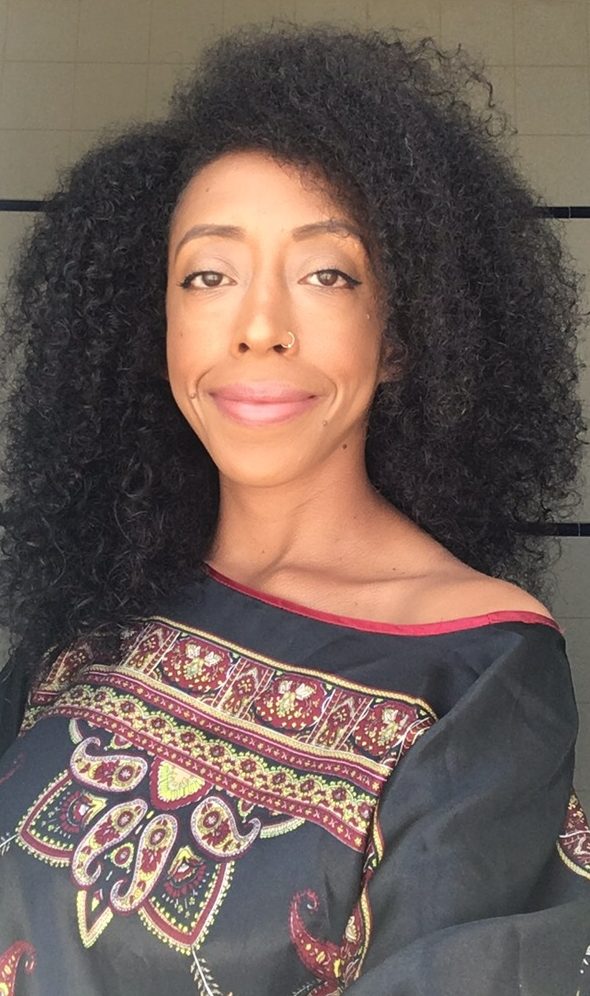
Overall, I loved the results of my Wash-n-Go, from cleansing right down to styling. I was impressed with how well my hair absorbed the products without feeling weighed down nor product overloaded. My hair had volume while having little to no frizz (I went to town with my Afro comb because I LOVE lifting my roots to create MORE volume). My curls were defined, soft, shiny and hydrated. 

Initially I did wish that the line included some kind of oil since I am used to applying one after moisturizing my hair however, I think that since both the leave-in and the curling custard include oils such as: sweet almond oil, black cumin seed oil, olive oil, argan oil, coconut oil and even Shea Butter & Cocoa Butter, I think for someone with fine hair such as myself the oils included in the products are sufficient. (I don’t know if those with thicker hair strands (coarser) hair would feel the same). I would have liked to see a Deep Conditioner in the product line because my wash day usually includes deep conditioning on a weekly basis. Maybe that will be added at some point.

Other than that, I enjoyed using the line & look forward to trying the other styling product I received when I do a Bantu Knot-out! 

Let me know if you have ever tried Revlon Realistic Black Seed Oil and what you thought!  

Maicurls

Wash and Go using Avocurl Conditioning Butter (Brand Ambassador)

Hello Maicurlies,

Here is my second styling tutorial using the Avocurl Line – Conditioning Butter.  

As I mentioned in my first tutorial using their Daily Moisturizer, I was contacted by the founder Jasmine, to be a Brand Ambassador. For this demonstration, I used their conditioning butter to do a Wash & Go.

Products/Tools used: 


My next post shall be product reviews on both the conditioning butter and the daily moisturizer.

P.s I have a discount code you can use to purchase Avocurl products from their site using: MARIANNE

(Disclaimer: all thoughts and experiences expressed are my own honest review). 

If you happen to buy any of Avocurl please let me know what you think of the products!

Maicurls

Avocurl Daily Moisturizer: Twist out (Brand Ambassador)

Hey Maicurlies,

Today I am super excited to share some news along with a tutorial! 

I was recently contacted by a natural product company called Avocurl. The owner (a gorgeous and extremely lovely natural herself) asked if I would be interested to join her Brand Ambassador program. I of course did my research on the company and their products before happily saying YES! I will have a product review video and post later this week but just a heads up, I was more than pleased to say yes because of the product itself (the ingredients in the products and the back story behind them). 

So without further ado let’s get on with the tutorial shall we:

I started on freshly co-washed hair and used: 

  • Avocurl Daily Moisturizer (as a leave-in)
  • DIY Coffee Bean Infused Almond Oil (to seal)
  • DIY Flaxseed Gel (for hold and definition) 

I applied the products as follows: Moisturizer, Oil and Gel. I let my hair dry and set overnight before taking down my twists with a little oil on my fingertips. I separated my very very very defined curls, fluffed a little and Le Fin! 

As the days went on, my hair got bigger and better (always happens with me and my fine hair strands). The photo below is day 3. 

Like I said, I was sent two products so my new tutorial will be using the Conditioning butter to do a wash and go followed by a product review of both. 

I want to quickly rethank Jasmine for sending me her lovely products, I look forward to working together with Avocurl

(Disclaimer: all thoughts and experiences expressed are my own honest review). 

If you happen to buy any of Avocurl please let me know what you think of the products (and don’t forget to use the code to get your discount!) 

Thanks

Maicurls

Perm Rod Curls – Valentine’s Day Look (option 2)

Hey Maicurlies,

So I managed to record and edit another “Valentine’s Day Look”. I figured since I was redoing my hair I might as well record it and heck why not throw on a dress that makes for a good “Valentine’s Day Date Look”.

dsc07363-copy

Ok so as the titles says it is a perm rod set and I used all DIY products and a Natural Oil. I ended up using 32 orange perm rods (originally I wanted to use less but forgot that was my initial plan) and let my hair air dry overnight before taking down the rods (with a little oil on my fingertips), separating and then fluffing my curls.

dsc07358

I always feel that having “faux bangs” really isn’t quite “for my face” but then I have a rather noticeable forehead so I want to rock a faux bang to cover it up so I opt for a to the side fringe thing…..anyways you get the point. In the video I tried both but ended up feeling “most like me” with it to the side, so that is what I stuck with for the final look.

Products/Tools Used:

  • 32 Orange Perm Rods
  • DIY Spray Leave-In Conditioner
  • DIY Hibiscus Flaxseed Gel
  • Argan Oil
  • Wide tooth comb
  • Afro Pick

dsc07367

Method:

I had sectioned my hair into little mini sections after cowashing my hair. From each section made (a total of 6) I would apply the products in this order:

  • Spray Leave-In Conditioner
  • Hibiscus Flaxseed Gel
  • Argan Oil 

After applying the products I detangle with my wide tooth comb (my hair was already detangled before) and then make smaller sections to roll. I start from the ends and work my way up, first rolling the ends of my hair onto itself and then in a slanted angle wind my hair around the rods. After letting my hair air dry overnight I use a little oil to help separate my hairs and reduce frizz while doing so, separate and fluff. 

Happy Valentine’s Day to all the lovers out there and as for us single girls/guys Happy Valentine’s Day to us too! 

Thanks

Maicurls

Maicurls

Valentine’s Day Date – Protective Hair Style

Hello Maicurlies,

So in the spirit of Valentine’s Day I decided to so a styling video for a “Date Look”. (I think I might potentially do a second styling option – depending on if I will have time to record and edit in time before V-day). 

dsc07090

I am keeping it simple (as always) and quick. The style looks quite “chic” a little edgy and works as a protective style as well so overall I like it! I also kept my product use simple too (once again as always). 

img_3011

So without further-ado let’s go!

Products/Tools Used:

  • Wide Tooth Comb
  • Soft Bristle Brush
  • Bobby Pins
  • Hair Bubbles
  • Hair Elastics
  • Dye Brush (pointy part to section my hair)
  • DIY Spray Leave-In Conditioner
  • Argan Oil
  • Cantu Moisturizing Twist & Lock Gel

It is easier to watch a demonstration rather than read how I did the style:

Tip: for those with shorter hair, you can use braiding hair to do this style by adding it to the middle and bottom section, and twisting your hair together with it. I would recommend either doing a loose flat twist with the pompadour section go backwards or just making three sections,  add braiding hair to all three and then make  two – two strand twists within each sections. (You will need to watch the video so that this is clearer).  

dsc07069

Tip: In case you don’t want to redo the style in the morning my suggestion is to take down the bobby pins (it is never a comfortable night with them in and not necessarily a good idea). Use a scarf to cover your hair, paying attention to your edges and side; for a smooth look in the morning and then just re-pin the twists down. You might need to “touch up” your edges with a soft bristle brush but other than that, it should be fine! 

So here is my “final look”. Like I said, if I can I will do another styling option too and hopefully have it up before the 14th! 

dsc07092

Whether you have a Valentine or not, are celebrating or not, I hope you manage to have a lovely day Maicurlies! 

Thanks

Maicurls

Maicurls

Bouncy Braid-out On Fine Natural Hair

Hello Maicurlies,

Quickly jumping on here to share my latest obsession…yes I know I have many “current favorites”….favorite of the moment? Anyways, yes I am here with a styling post.

Braid and Curl

Braid and Curl

Yes, it is a braid and curl, I LOOOOVE this style Maicurlies! 1. it is simple to do, 2. it is quick to do, 3. it tends to get better (aka bigger and fluffier) as the days go on and 4. look at my volume (even on my fine hair)! 

So I will quickly explain the products used, the process I used and then will let the Video demonstration from my YouTube channel do the rest. 

Products/Tools

Process

Braid and Curl

I actually (oddly) prefer the results of doing this on wet hair (normally I prefer dry styling) but when I start on wet hair and incorporate the combination of products mentioned above I nearly always (95% of the time) get results I am super pleased with. I start on wet hair that was either co-washed or deep conditioned. While in the shower i detangle, split my hair into 3 and twist each section (left, right and center). My application process is: Leave-In, Oil, Gel. I make a total of 8 braids; 3 left, 3 right and 2 in the center and do not braid all the way down, just a little more than half way before wrapping my hair around the 8 perm rods. 

I let my hair air dry overnight by pinning the braids down with bobby pins and covering with a silk scarf. The following morning I take down the braids with a little oil on my fingertips (any will do), separate sections and fluff the heck out of my hair with an Afro pick. That is it! 


Thanks!

Maicurls

Maicurls

DIY Freetress Flexi Rod Crochet Wig

Hello Maicurlies,

Today I am going to be sharing how I made my first ever crochet wig (Annabelle). 

Freetress Crochet Braiding Hair - Bouncy Twist out turned Flexi Rod Curls

                                     Freetress Crochet Braiding Hair – Bouncy Twist out turned Flexi Rod Curls

I watched a number of videos on YouTube before I proceeded to make my own wig however, I quickly found out that while some of the stunning & talented women in the videos were able to make their wigs in a “few hours” it took me forever! Literally I split the process over two days (the weekend) and spent about 10 hours in total. This was only after I had initially made 2 failed attempts (two weekend before) with the Freetress Crochet Braiding hair – Bouncy Twist Out (colour 2). 

I initially wanted to make my wig to look the same as the crochet braids on the hair model however, it proved to be a challenge for me. The hair was just so thick it not only looked overly “fake” on my small face but it was overwhelmingly bulky. So in order not to give up I ended up changing the curl pattern of the hair by: moisturizing, detanglng, separating and re-curling with flexi rods and hot water. Once that was done I was able to make Annabelle with a lot more ease!

Annabelle

I have a detailed review about the crochet hair which I purchased online from Tisun Beauty (you can read about here.)

It is a lot easier to explain my wig making process via video which you will find below. 

Would love to hear from you, if you have attempted a DIY wig let me know how it went! 

Thanks

Maicurls

Maicurls

Review: Shake-n-Go Freetress Crochet Braiding Hair Bouncy Twist Out – Tisun Beauty

Hello Maicurlies,

I am currently away on holiday but I prepared a post in advance for my time away and today I shall be doing a detailed review on some Crochet Braiding Hair I bought and used to make a DIY Crochet Wig! The hair I will be reviewing is: Freetress Crochet Braiding Hair Bouncy Twist Out that is part of the Shake-n-Go collection. 

Freetress Crochet Braiding Hair - Bouncy Twist out

Freetress Crochet Braiding Hair – Bouncy Twist out

Before purchasing this particular hair I wanted to read some reviews however, I found out that there was literally hardly any information about the hair (at least from my search). So I decided to buy it anyways because I was in love with the models hairstyle and decided I would try and recreate it but instead of doing crochet braids, I opted to try and make my own DIY Wig. Please note – this review is not about how I made the wig or details on the wig itself, it is simply about the hair used.

NOTE: I paid for the hair myself and I was not requested to do a review on the hair. I simply wanted to share my experience in case some of you come across the hair and want to know what others think about it. 

I shall break this review down into two parts: the first will be about the beauty supply store where I purchased the hair from and the second part will be about the hair itself. 

Tisun Beauty:

I bought the hair online from Tisun Beauty, a beauty supply store that sells not just crochet hair but also weaving hair, braiding hair, clip-ins, wigs, skin care products and hair care products. They also have a store front that you can physically visit in North Carolina (check the bottom of the post for the full addresses). I highly recommend purchasing from Tisun Beauty, they offer a number of different style options, different brands, colours, lengths and hair textures! Another aspect I love is the company’s excellent customer service! I was in touch with Steve and he was extremely helpful! He answered all my questions promptly, provided me with suggestions and was super helpful when it came to the shipping options available to me (shipping outside the States). If you are looking for a source to buy hair, I really do suggest giving them a try and if you get in touch with Steve, rest assured you will be in good hands! 

P.s. I have a discount code for any of you that do decide to purchase from Tisun: http://tisun.refr.cc/5XBXKRV. You will get $5 knocked off your order if you use the code and when you purchase from them you automatically get enrolled in the $5 discount referral program too! I got enrolled after making my purchase,

Now let’s get to the hair! 

Details: 

  • 5x Freetress Crochet Braiding Hair Bouncy Twist Out – 23″  in the colour  2 (Dark Brown) $5.99 per packet.
  • Each packet contained about 10 – 12 strands per pack.

******

Cons:

Dry & Rough – When I took the hair straight out of the packet I will be honest, it did feel really really dry and rough. Now I know the texture is suppose to mimic natural (black) hair however, I feel like it was just a tad bit too much on the dry side. Solution – I first washed the hair since I have super sensitive skin (2 oz of apple cider vinegar to a lot of water) & to restore some moisture to the hair I added a little conditioner (that helped). P.S when using the hair I sprayed it with a little plain water and rubbed some whipped Shea butter before installing the hair, this completely softened and moisturized the hair. 

Tangles & Frizz – this hair really tangles up quite easily and quickly. There is a quite a bit of frizz once the wig was made which can get really annoying since it ends up making the individual curls I have to sort of “tango together”. Solution – I recurled the hair roughly 3 times (approximatly once a week) and once it was reculred the frizz and tangles were gone (the hair requires maintaince in order for it to not look like a tangled mess! 

Uber Thick Strands – I tried using the hair in its original curl pattern (bouncy twist out) and while I love how beautiful and full each strand of hair is, they are just so thick! I can not imagine how each strand is installed into someones actual hair (cornrows) due to how thick and “chunky” the strands are! I made 2 (failed) attempts at making the wig with the curl pattern but had to redo them and then gave up. – Solution – I opted to change the curl pattern in the end because the wig ended up looking like a chunky, bulky pile of hair on my head! 

Can Not Separate – I know some of you will wonder “well why didn’t you separate the strands in half” I did….and that didn’t work. Once I tried to separate the stands in half I ended up destroying the beautiful curl pattern and was left with half curled, mainly frizzed strands! Solution – same as above, I combed out the hair, separated the strands and then made my own curl pattern (not a bouncy twist-out). 

Pros:

Changeable Curl Pattern – while I did not end up with the original look I had envisioned the hair can be used to create different curls by wrapping it around flexi-rods or perm rods, pouring hot water over them and voila a new look!

Beautiful Original Curl Pattern – now while I was unable to use the hair in its original state for a wig, perhaps it is more effective as crochet braids (especially since that is what the model had) and the original curl pattern really is gorgeous!

Not Very Expensive – as I mentioned, each packet comes with roughly 10 – 12 strands in them and each pack costs $5.99. If you are able to recreate the original crochet braid look like the model I would imagine that you would need a maximum of 3 packets (maybe a little less) since the hair is so full and thick. That is not too much on the pocket for a protective style that you can keep in for a few good weeks!

Colour/Length Options – while I went for the 23″ option (I did trim the hair to give it shape) and you can also select from a number of different colours, blended colours etc. 

Looks Natural – the natural texture of the hair has that “natural look” and by that I mean it does not have that “fake” shiny appearance even though it is synthetic hair! Sometimes synthetic hair can give off that uber shiny appearance after heat is used on it (e.g. hot water) but this still kept its natural look. 

Accepts Heat – in order to change the curl pattern of the hair I had to pour and soak the curled sections in boiling hot water (no more than 30 seconds – 60 seconds maximum) and this didn’t cause any damage to the integrity of the hair. The package instructions actually states: “Do not use hot curler at regular setting. This fiber can only be curled 350 degrees Fahrenheit – 400 degrees Fahrenheit”. 

Below is an image gallery of the hair along with some photos of how it looked after I changed the curl pattern & made the wig.

Overall:  Would I purchase this hair again? I probably would not simply because I had initally bought it to use the hair in its original curl pattern and was unable to do so however, I might potentially consider buying it if I learn how to crochet braid my hair in order to try and get that beautiful look I primarily wanted! Side note – I do have a few ideas for some new hair I want to buy and I already have some hair that I plan to use for another protective style! 

Tisun Store physical location:

Tisun Beauty
5420 North Tryon St #1,
Charlotte, NC 28213

Have any of you used Freetress Crochet Braiding Hair Bouncy Twist Out before? If so did you use it to do crochet braids, a wig, another type of protective style? I would love to hear from you! 

Thanks

Maicurls

Maicurls

Knock Off Curl Former Review

Hello Maicurlies,

Today I have a review that I would like to share with you!

DSC05089

Now yes I know, I know, this review is going to be based on something that isn’t “correct”……I can live with the fact that I bought something fake (sorry)! So yes, this is all about my knock-off curl formers. You have no idea how much I wanted to buy these for the longest time and I finally was able to get my hands on some (yes not the real deal but still).

Disclaimer: So before I get into this review 1. I bought the knock-offs with my own money and I was not requested to do this review, I just wanted to share my experience and thoughts of them. 2. If you feel strongly (against) buying none originals then please skip this post…because you won’t like it (but then come back and read something else). 😉

Why did I opt for the knock-offs instead of the originals?

To break it down I have several reasons but the main two are: The originals are more than double the price of what I paid, I would have gotten less of the originals, and since I was not sure how much I would like/dislike them I decided it made more sense to pay less (in case I didn’t like them). 

Where can you buy the knock-offs?

I know that in the past the Vakind knock-off curl formers were available on Amazon however, I think they must have been blocked and blacklisted (I tried my darnedest to find them without success) so I ended up having to purchase from Ebay. There are different sellers on Ebay offering different sized knock-off curl formers and different widths too. I bought mine here and this is the seller details.

Details on the knock-offs I bought:

The seller offers (as off 13.03.2016)

  • 10 curlers with 1 hook GBP 4.51 ($6.49)
  • 20 curlers with 1 hook GBP 7.91 ($11.39)
  • 30 curlers with 1 hook GBP 10.81 ($15.56)

The curlers are manufactures and sent from China. When I bought mine I ordered 60 curlers  (3 x 20 curlers). First I made an order of just 40 but then decided to add another 20 and paid $33.57 in total. I actually got 1 hook for each 10 curlers so I ended up with a total of 6 hooks even though I paid for 20 curlers and 1 hook…go figure (I am not complaining). My curlers are 45 cm long when stretched and 2.5 cm wide. As I mentioned there are different types of curlers available on Ebay and this seller actually also offers longer curlers on a different page (I didn’t notice this at the time but would have gone for those if I had). 

Each packet of curlers came in 10’s – 5 orange and 5 pink along with the hook (there is no colour option). The two colours lay your curls in opposite directions so the curls lay and frame your face nicely.

**

Now I want to mention a few Pro’s and Con’s about the knock-offs along with some of the experiences I had while ordering them to keep you informed and provide as much information as I can.

Con’s:

DSC03215

Packaging – The curlers cam in sandwich bags, there was no pretty packaging so don’t expect to get something sturdy and “pretty” to hold your curlers. If you have a unused container/bag you might want to transder the curlers to that so you have them all together (that is what I did for the most of them). 

Instructions – There was no instructions on how to use the curlers. You can find a little guide on the sellers page when you order them but you don’t get instructions with the package. (If you are unsure about how to use them, I suggest watching a ton of YouTube videos beforehand so you know what you are doing and you don’t damage your hair). 

Hook – It is very simple to put the hook together but it can be a little tricky (requires a little strength) to pull them apart. I am unsure if it is the same with the origianl curl formers but you do have to pull the hook parts with a little strength to get them separate.

Communication – Communicating with the seller was really quite tedious! English is not his first language and since I don’t speak Chinese it became a little difficult when I contacted him to ask some questions. You will require a little patience (a bit of patience) since Emails can perhaps go back and forth without getting the answers you are looking for at first. In the end it worked out but just remember to be patient. (This can apply for other sellers on Ebay since they too might not speak the same language you do). 

Lost Order – I had to have my package resent to me because when I initially made my order, I never recieved the package. I Emailed the seller to inform him and he immedietly resent the package the following day after the email, so the issue was resolved but I feel like I need to mention this point. 

Curler ends – Some of the edges of the curlers seemed to be a little stuck together, probably from when they melted the plastic. However, once you put the hook through the curler they open up as normal. 

Uncomfortable – This is something that I think applies to all curl formers, at least from the reviews I have seen on YouTube (both originals and knock-offs). Trying to sleep with these in your hair is a nightmare! The curlers are quite hard and uncomfortable so be prepared for a sleepless night if you choose to leave them in! 

Installation – When I first tried the curlers it was not all that simple to get the hang of it, but once I got a few of them installed it become easier. 

Pro’s

Price – I got to save A LOT of money by opting to go for the knock-off’s it was nearly half the price to get 60 of these compared to double the price of the originals for just 40. 

Multiple Hooks – With the originals you get 2 hooks for 40 curlers with this option even if I went for 40 curlers I would have gotten 4 hooks (since I opted for 60 curlers I got 6 hooks) but the bottom line is you get more hooks which means if you break one, you will have extra and you can set up more curlers at a time which saves you time while installing! 

More Curlers For Less – More bang for your buck! You get more hooks that you would (in terms of price of the originals)! 

Free Shipping – I opted for free international shipping when I ordered which meant that I didn’t have to pay anything to get the package delivered however, going for this option meant having to wait 25 business days. You do have the option of getting the package sent quicker by paying roughly $35 (this was what it would have cost to get it sent from China over here so depending on where you live the price will change) and with that option I was told I would receive the package within 5 –  7 business days but I opted to wait. 

Size Options – Talking about buying knock-offs from Ebay, you get a number of length and width options when it comes to the curl formers you can buy so even if you do not opt for this seller, check out other pages on Ebay, I am sure you will find the right knock-offs you are looking for! 

Tip: When you order yours keep in mind that you might want to let your hair grow and if you plan on continuing to use them as your hair grows, try go for curlers that are longer than your hair. This way you won’t “out grow” the curlers (this is something I forgot!). However, if you do have curlers that are too short for your hair you can two strand twist your roots and then install the curlers a little lower down (below your roots) to make up for any missing length. 

Sometimes if I didn’t get all my hair within the latch of the hook my hair would refuse to want to be pulled through, if that happens STOP, push your hair back and retry! If you continue to try and pull your hair through you will yank your hair out!

I didn’t do a “how to” video on the curl formers since I feel there are thousands of videos out on YouTube already however if you would like to see a tutorial please let me know. I have a video review of the curlers along with a very quick (few second) demo of how I took down my curlers which was initially made for my Instagram page at the end of the review. 

DSC05055

DSC05042

Please let me know what you think of this review. If you own curl formers, knock-offs or decide to purchase some from this seller or someone else on Ebay please let me know how it goes, I love hearing from you!

Maicurls

Maicurls

How To: (Dry) Perm Rod Set on Fine Natural Hair

Hey Maicurlies,

I am back with another styling video. 

(Dry) Perm Rod Set on Fine Natural Hair

                                          (Dry) Perm Rod Set on Fine Natural Hair

This is my Perm Rod Set done using orange perm rods. I bought the perm rods on Amazon (here). 

36 x Perm Rods Jumbo Tangerine (3/4 inch diameter)

                     36 x Perm Rods Jumbo Tangerine (3/4 inch diameter)

My method is the same as everyone else’s (nothing special at all) but I love the results I get. 

If you have seen my hair before you will know that I have what I call fine and thin natural hair. It is long but still on the fine and thin side and I usually prefer setting my styles on dry hair versus wet hair. Starting with dry hair usually results in fluffier and fuller looking curls. When I set on wet/damp hair I get great definition but it lacks the fullness I like so I opt for dry styling. 

Tools/Products Used:

The following morning:

Method:

Starting on dry hair that was stretched out I first separate my hair into sections (about 8) from which 2 – 3 perm rods will be used per section. I ever so slightly spritz my hair with water, followed by my DIY Creamy Leave-in and detangle. I then use a tiny dab of gel for hold and definition and then twist the root of my hair (twirling it)  2 – 3 times and then wrap my hair around the rod. I do a twisting motion at the same time as I wrap my hair around the rod. I used a total of 26 perm rods, leave them in overnight with a scarf protecting my hair during the night. The next morning I take a little oil to my fingertips to take down the perm rods. I then separate my hair by unwinding the root in the opposite direction of how I twirled my hair and then separating the hair. Once I have separated at least once I lift my roots and fluff my hair with an afro comb and continue to separate and shape till I am satisfied with the results. 

My “how to” tutorial: 

Thanks

Maicurls

Maicurls