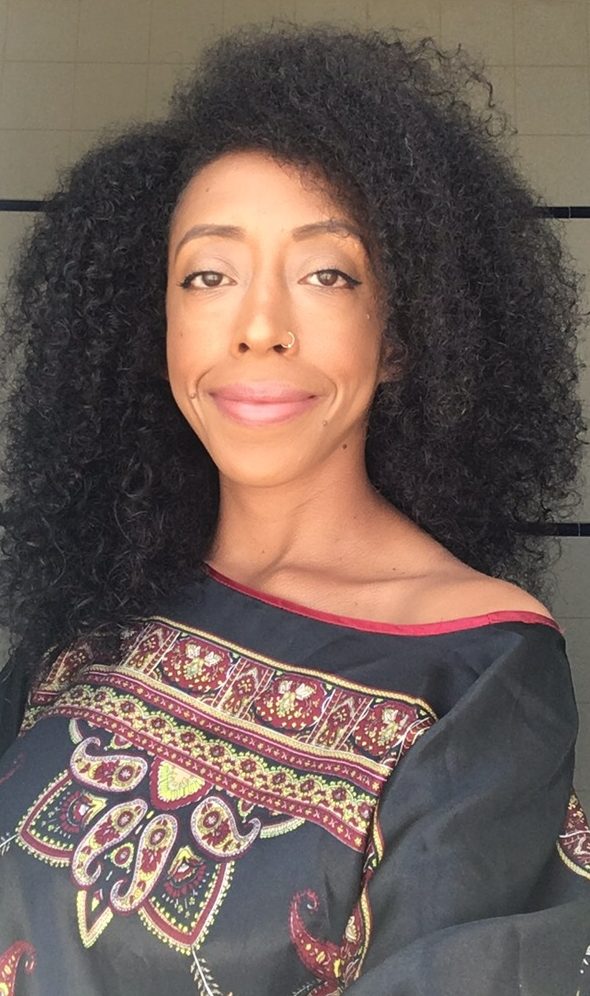
Today I am super excited to share some news along with a tutorial!
I was recently contacted by a natural product company called Avocurl. The owner (a gorgeous and extremely lovely natural herself) asked if I would be interested to join her Brand Ambassador program. I of course did my research on the company and their products before happily saying YES! I will have a product review video and post later this week but just a heads up, I was more than pleased to say yes because of the product itself (the ingredients in the products and the back story behind them).
So without further ado let’s get on with the tutorial shall we:
I applied the products as follows: Moisturizer, Oil and Gel. I let my hair dry and set overnight before taking down my twists with a little oil on my fingertips. I separated my very very very defined curls, fluffed a little and Le Fin!
As the days went on, my hair got bigger and better (always happens with me and my fine hair strands). The photo below is day 3.
Like I said, I was sent two products so my new tutorial will be using the Conditioning butter to do a wash and go followed by a product review of both.
I want to quickly rethank Jasmine for sending me her lovely products, I look forward to working together with Avocurl!
(Disclaimer: all thoughts and experiences expressed are my own honest review).
If you happen to buy any of Avocurlplease let me know what you think of the products (and don’t forget to use the code to get your discount!)
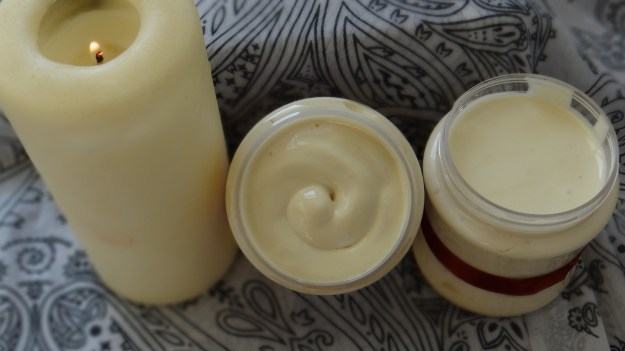
I was requested to share a whipped butter recipe that doesn’t include Shea Butter or Coconut Oil but first, I have a few other whipped butter recipes which you can find below:
I replaced the Shea and Coconut Oil with alternative ingredients but the process of making the whipped butter follows the same pattern as the previous mixes I have shared above.
Ingredients/Tools:
3oz Unrefined Cocoa Butter
2.5oz Mango Butter
2.5oz Coffee Butter
4oz Coffee infused Grapeseed Oil
3oz Extra Virgin Olive Oil (EVOO)
0.1oz Glycerin (optional)
3 drops Peppermint Essential Oil (optional)
3 capsules Vitamin E Oil (0.15oz)
5 drops Chocolate Fragrance (optional)
Double Broiler
Spoon
Weighing scale
Containers
Gloves (optional)
(P.s I purchased all my butters from SheaButter Cottage – an awesome company that not only provides superb products but also gives back to local village women in Ghana with every purchase made!)
Ingredient Alternatives:
The EVOO and Grapeseed Oil can be replaced with any other carrier oil of choice. You can replace the butters as well, I suggest using at least one hard butter (if you live in warm climate). The Essential Oil can either be replaced with an oil of choice or omitted altogether. Keep in mind that EO’s MUST be diluted otherwise it can cause skin/scalp irritations and if you are pregnant please refrain from using any EO.
Mixing Process:
You want to first double broil the Cocoa Butter on low/medium heat for no more than 5 minutes. Once the butter melts (don’t melt all the way) remove it from the heat and add the mango & coffee butter along with the Extra Virgin Olive Oil and stir. Place the bowl in the fridge for 15 – 20 minutes. Whip the mix and then add the remaining ingredients. I like to replace the bowl in the freezer for 15 minutes before I do a final whip till I get it to the consistency I like.
Benefits:
Unrefined Cocoa Butter: is an extremely popular natural ingredient that is used to help increase the hairs manageability and moisture. The butter is known to help reduce hair loss and breakage. Due to its highly moisturizing properties it can alleviate scalp itching and irritation which in turn can eliminate dandruff. Since it is a fat, it can be used to replenish lost oils due to chemical processes such as perms and dye. It is known to effectively strengthen hair, tame frizzy and flyaway hair.
Mango Butter: Mango butter contains high levels of antioxidants and beneficial vitamins A, C, and E. It is a highly moisturizing butter which is able to restore flexibility, effectively treat dry and itchy scalps and therefore aid in the growth of hair (due to a healthy scalp.) Because of its high content of fatty acids it is believed that it might actually be more moisturizing that Cocoa and Shea butter (I cannot attest to that as I have never used it before.)
Coffee Butter: caffeine helps with hair growth stimulation and it helps reduce shedding. The natural butter helps with sealing in moisture, provides shine, makes the hair soft and (p.s is incredible for the skin)
Extra Virgin Olive Oil: can be used to help seal in moisture, aid hair manageability but can be a little “heavy” (especially for those with fine hair) therefore it is best to use it lightly so it does not weigh your hair down.
Grapeseed Oil: Another example of an oil that is easily absorbed into the hair and scalp without weighing down the hair or clogging up pores due to the fact that it is an extremely “light” oil. Although it is a “light” oil it gives hair a sheen so those with fine hair can use it without worrying about having greasy hair. It is known to help heal alopecia areata as well dry and itchy scalps therefore helping fight dandruff. It is great and sealing in moisture and retaining the natural moisture in our hair.
Vegetable Glycerin: Vegetable Glycerin is a humectant since it attracts water in the air (humidity) and directs it to the area applied (the hair.) Due to its oily nature it can also be used as a sealant and “trap in” moisture however should be used sparingly and should be diluted since it is thick and sticky. Vegetable Glycerin is better served when used in humid climate since it attracts that moisture however, if used when there is a lack of humidity in the air it can do the opposite (extract moisture from the hair to the air.)
Vitamin E Oil: Vitamin E is a commonly used oil to help extend homemade products shelf life (however only extends products for a little bit.) This oil rejuvenates and offers protection for the scalp and skin by nourishing both.
Peppermint Oil: Helps to stimulate blood flow to the scalp which results in hair growth as the root of the hair is being nourished.
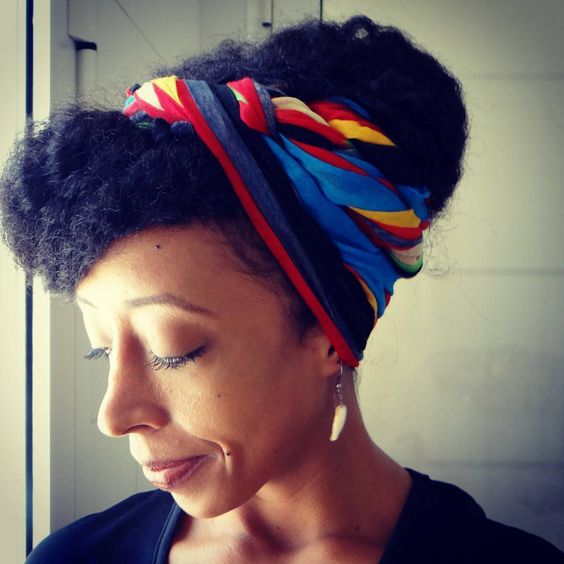
Today I wanted to share one of the methods I use to remoisturize old hair & how I style my hair in a low manipulation style (when I went camping for 2 nights).
So I was off to a beach camping trip for 2 nights and my hair was a MESS! I had it in a twist out that turned into a messy bun. The curls were tangled, dry and just not in a good way! Since I was camping I knew I didn’t want to do anything “drastic” especially since I would be washing my hair once I got back. I also knew I wanted my hair tucked away since sand and my hair just don’t play nice at all so I figured I would remoisturize, bring back some texture but still keep my hair tucked away.
My remoisturizing method was simple, the L.O.C method (Leave-in/liquid, Oil, Cream/Whipped butter) I also used permrods and that was it. I did not use a comb to get through my hair since I wanted low manipulation and to protect my hair during the trip I used a scarf to keep my hair up and away from my shoulders and presto.
Braid and Perm Rod Set
Braid and curl
Braid and curl after separating
Braid and curl
Products/Tools Used:
DIY Spray Leave-In Conditioner (I have two versions on my blog: here and here)
I parted my hair into sections (roughly 15 – 18 in total), spritzed my hair with my DIY Spray Leave-In Conditioner followed by my oil. I then gently, carefully and slowly detangled my hair and get rid of shed hair. I braided my hair but left my ends unbraided. I added a little extra spray leave-in on the ends, smoothed on some whipped butter before wrapping them around the perm rods and then rolling up to my roots.
wrapped up braid out
wrapped up braid out
wrapped up braid out
wrapped up braid out
Once I was done I covered my hair at night (I kept it uncovered right until I went to bed). The following morning I took down the perm rods and using a little oil on my fingertips I undid the braids. Now if you want to have definition then take the braids down carefully to keep the integrity of the curl pattern (since I just wanted a little texture, a little volume and was going to cover my hair it didn’t really matter for me). After I took down the braids I separated my hair a tiny bit and covered my hair with the scarf, leaving a swooped bang at the front (the ends tucked away) and pinned the rest of my hair upwards. Presto: happy moisturized and protected hair ready for camping!
I have a video of the whole process:
P.s. In case you were wondering, here is a peak at the spot where we camped.
What is your go to method to remoisturize “old hair” mid-week/before washing your hair?
At long last I have a skin care tutorial & video! This is going to be about my DIY Body Butter Bars, I LOVE these gems! They are excellent for the winter months when the weather is cold and dry resulting in dry and sensitive skin.
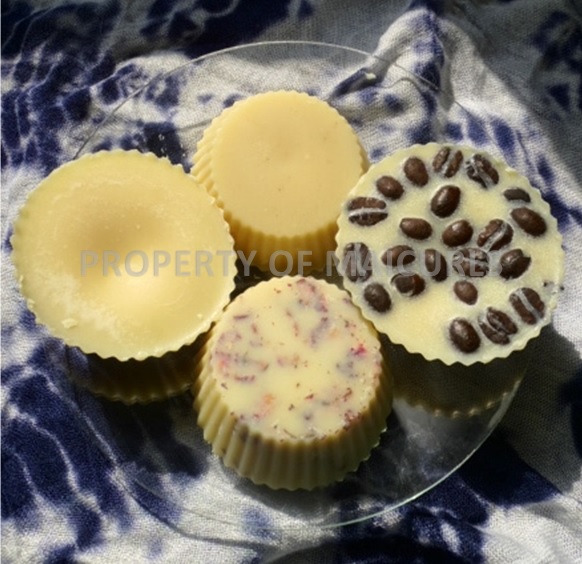
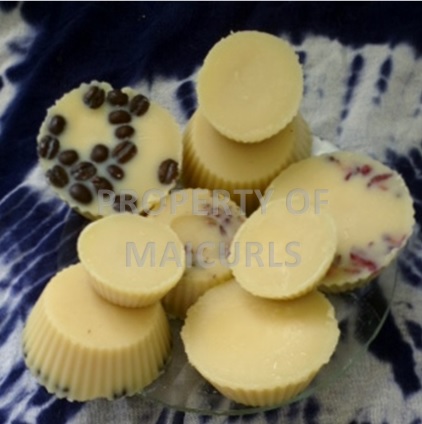
Body Butter Bars
I have 2 different recipes my CoSheaCo Bars (I add some exfoliating ingredients to make a few exfoliating Body Bars) and my Simple CocoaCo Bars which only consists of 2 ingredients.
What are Body Butter Bars?
Literally they are bars made up of oils and melted butters to help moisturize and seal in moisture. You can add additional ingredients to make them super moisturizing e.g. glycerin/honey/agave nectar or coffee beans/dried roses/dried lavender/sea salt etc to make them exfoliating Body Butter Bars. They can be used in place of lotions or creams after a shower or bath.
Ingredients
CoSheaCo Bars (recipe yields 6 large and 3 small bars)
125ml Unrefined Cocoa butter (4.2oz)
80ml Unrefined Shea Butter (2.7oz)
60ml Virgin Coconut Oil (2oz)
40ml Coffee infused almond oil (use any carrier oil of choice) (1.4oz)
1 teaspoon glycerin (optional) – can replace with raw honey (my teaspoon is 0.1oz or 3ml)
20 drops grapefruit essential oil (optional) – use any essential oil of choice. (If you are pregnant do not use essential oils!)
CocoaCo Bars (recipe yields 4 small bars)
Instructions
1. I slowly melt the butters using a double broiler in a heat proof glass bowl. 2. I take the melted butters off the heat and add the Virgin Coconut Oil. 3. I add the other ingredients (e.g. Glycerin, Coffee infused oil and Essential oil in the CoSheaCo bars) once I know the butters are not really warm. 4. If you are making exfoliating bars put your chosen ingredients (coffee beans and rose petals) in the molds and then pour the melted butters and oils into the mold. 5. I let the mixture sit on a counter for a few minutes and then place the molds in my fridge. I prefer setting mine overnight (let them set for no less than 4 – 5 hours until they are completely firm, longer if possible). 6. Once they are set, gently pull back the edges of the molds and the bars will slide out.
I use silicon molds but for the purposes of this demo I also used metal molds in case you don’t have silicon ones.
Making CocoaCo Bars
Making CoSheaCo Bars
Storing the bars:
I always store my bars in the fridge in an airtight container. Since I do not use Beeswax in my recipe there is the potential of the bars melting in warm climates or hot households (more likely in summer) but I do not risk it so I store all but the one I will be using in the fridge*. The fridge and airtight container also helps to keep the bars from going “off” too quickly, but the general shelf life of the bars should be 6 months – 1 year since no bacteria inviting ingredients (e.g water, Aloe Vera juice etc) are used in combination with the oils and butters in the recipe. I keep the bar being used in an airtight container in a dark cupboard in my bathroom room.
* There is nothing “wrong” with beeswax, it is a natural ingredient but I choose not to use it simply because it tends to sit on my skin and I do not like that feeling (I have sensitive skin). There are thousands of Body Butter Bar recipes online that follow the same ingredients I use but also include beeswax.
How to use:
After a shower I don’t completely dry off all the water with a towel, I then rub the bar between my dry palms and apply like I would a body cream. The bar will help trap in moisture from the water and also add amazing benefits from the butters and oils. With the exfoliating bars I rub the bar itself onto my skin to get the additional scrubbing effect.
Benefits of the ingredients used:
Cocoa butter – is known for its deep hydrating and moisturizing properties due to its high fatty acid content. It is said that the butter can help reduce stretch marks and the fact that Cocoa butter is packed with antioxidants, means that it can help fight off free radicals and skin irritations such as eczema and dermatitis.
Coffee bean infused almond oil – is rich in vitamins A, B, D, and E, has been used to improve the skins complexion and its emollient properties soften the skin. Almond oil is quickly absorb into the skin and has healing and hydrating properties. The coffee bean infusion helps to tighten the skin giving you a youthful fresh glow, reduce the appearance of cellulite, reduce redness and skin inflammation and is known to fight free radicals thanks to the antioxidants contained in caffeine.
Coconut oil (Virgin) – is very good at re-hydrating the skin because it is absorbed into the skin and conditions, moisturizes, and softens the skin. Coconut oil naturally clears away dirt, grime, and dead skin cells and due to its anti-bacterial and anti-viral properties. The oil acts as a good protectant against skin irritations and rashes. It is known to soothe insect bites, flaking skin and mildly sun damaged skin.
Glycerin (Vegetable) – is a natural humectant that draws moisture onto the skin by extracting it out of the air. Apart from its ability to draw in moisture, it is also known to help retain moisture in the skin. This makes Glycerin a great agent in fighting rough, dry, irritated and dull skin. It also makes it an excellent skin plumping product.
Grapefruit essential oil – aside from its delicious scent, it has antiseptic qualities and helps to clean and clear congested skin and to treat oily skin.
Rose petals & Coffee beans – used as exfoliating ingredients to help remove dead skin cells and stimulating blood flow.
Shea butter – is highly moisturizing, improves the skin’s softness, suppleness as well as soothes burns. Shea butter can also be used as a mild “sun protectant”, soothes, moisturizes and is an effective anti-aging & anti-wrinkling butter.
I have a video on my YouTube Channel (below) showing you exactly how I make both Body Butter Bars.
Have you used/made a Body Butter Bar before? What is your favorite? I would love to hear from you 🙂
My oil infusion has finally come to an end. I know, I know you all are doing a little happy dance and saying fiiiiinnnaaalllly! Yup this is it, no more oil infusion frenzy.
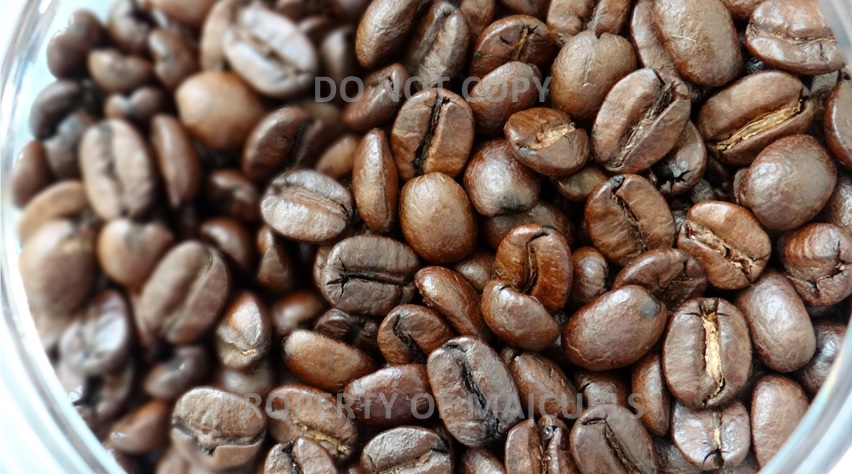
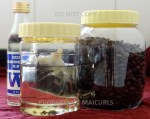
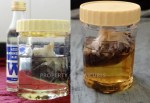
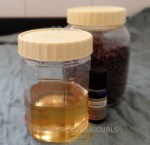
As you probably guessed (thanks to the title and picture) the oil I will be sharing is my DIY Coffee Bean Infused Almond Oil! Doesn’t the coffee beans look oh sooooo good?!
Right, first off I need to stress how much I LOVE this oil!!! Of all the 6 in fusions I have done this is right up there along with my DIY Rose Infused Grapeseed Oil. As with most of my infused oils you can use this one for both your skin (face/body and scalp) as well as your hair.
Finished Coffee bean infused Almond Oil
For the hair:
Reduces hair shedding and said to reduce excessive hair loss because of the antioxidants present in caffeine.
Increases hair growth since caffeine promotes blood circulation in the scalp which promotes growth.
Known to darken the hair and slowdown the early onset of grey hairs (with frequent and consistent use)*
Adds sine and dimension to the hair due to the darkening effect of the oil
*Should you have bleached/blond or dyed hair you do not want to darken, I suggest not trying this oil.
For the skin:
The caffeine helps reduce puffy and dark circles under the eye.
Tightens the skin giving you a youthful fresh glow.
Its anti-inflammatory properties is said to reduces redness in the skin and inflammation.
Said to reduce the appearance of cellulite.
Known to help reduce the appearance of fine lines and wrinkles on the face.
Fights free radicals thanks to the antioxidants contained in caffeine.
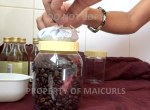
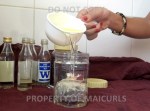
Mixing Process:
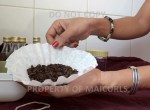
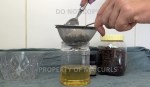
I blend coffee beans for a few seconds then place them in a coffee filter
Close the coffee filter with string
Cover the coffee beans with Almond oil
Let it infuse for 2 weeks
Comparison of infusion before and after (right after 2 weeks)
Place the filter in a sieve the collect excess oil from the coffee beans in the filter
I have a video up on my process:
NOTE:I am not a dermatologist nor a doctor. I provide this for informational purposes only so please consult with a professional before you apply anything new to your skin or hair. Should you be taking medication or creams from a medical professional please do not replace that with my DIY recipe – consult your medical professional first! If you are allergic to any of the ingredients I use do not use them. Do a small patch test on the inside of your arm when trying anything new before applying it all over your hair/skin. Always ensure to dilute the Essential Oils (EO) in a carrier oil as they can cause skin irritations if used undiluted. If you are pregnant you should NOT use any EO.
If you try this please let me know how it turns out. If you make your own Infused Coffee Oil I would love to hear from you!