Category Archives: Protective Style

Hair Style

Protective Style & Castor Oil Week 3 Update

Good day Maicurlies,

I’ve reached the halfway mark of my Protective Style and Castor Oil challenge and I am still digging it!

You can read about my previous weeks here:

How did my third week go?

I must admit I sort of hit a little bump on the road in terms of how to style my hair but I figured something out in the end.

Protective Style challenge week 3

                                       Protective Style challenge week 3

I did not plan properly, washed my hair late at night on Sunday and everything just got dragged out but I managed. Similar the my previous weeks I did 2 styles (kept the styles for 3 days each) and then washed my hair at the end of the week.

The styles I did were “flat twists” (I’ve mentioned before  – flat twists and I are still trying to build a relationship) but I figured I would get to practice some more…

What Did I do?

  • To start the week I had washed, Deep Conditioned, moisturized and sealed before twisting my hair into 5  chunky twists.
  • Day 1 – After taking down the twists I massaged my Castor Oil Mix on my scalp, hairline, ends and put my hair in my first hairstyle: 3 really loose flat twists (one on either side of my head and one in the middle). I accessorized with different ribbons over the 3 days…to distract people from my not to neat flat twists.
First style - 3 loose flat twists and accessories (this was the last day before I changed the style).

First style – 3 loose flat twists and accessories (this was the last day before I changed the style).

Second style - One big flat twist (on the right) pinned down and a two strand twist pinned back.

Second style – One big flat twist (on the right) pinned down and a two strand twist pinned back.

  • Day 6 – I took down the flat twist at night, massaged my scalp, hairline and ends with the Castor Oil mix and pineappled my hair to sleep.
  • Day 7 – Wash day routine and then got my hair ready to be set for week 4.

Castor Oil Challenge:

 I used the oil 4 times and think I might stick with just applying it 4 times. I do not think my hair will be happy with me if it is coated even though I have diluted the Castor Oil…I know my limits :D.  I have my recipe and a video of the mixing process here.

Again my hair felt great throughout the week: moisturized, soft, smooth, less tangles and shine galore! While I am not really looking to “grow out” my hair, I will admit that I am interested to see how much length I retained/gained at the end of the challenge.

Week 4 here I come!

Maicurls

Maicurls

Protective Style & Castor Oil Week 2 Update

Good evening Maicurlies!

Protective style challenge week 2

Protective style challenge week 2

It has been two weeks since I started my Protective Style & Castor Oil challenge and let me tell you, I am LOVING it!

Protective style update:

In all honesty I have always been a fan of wearing my hair out….”FREE” because it is so much easier for me to do a simple twist-out or braid-out, but I am appreciating this challenge. Is it a little difficult for me to come up with styles to wear? Yes. I have said this before and will continue to say this: I am NOT a styling guru and I am not “creative” in terms of unique styles however, I do what I know/can.

How did my second week go?

Similar to week 1, I enjoyed the fact that I didn’t have to “mess” with my hair too much, especially in the morning before work. I would lightly touch up my edges and be on my way. As always I slept with my scarf around my head at night and that sort of helped with the fly-aways. My hair felt really moisturized, soft and looked shiny (LOVE). I only moisturized and sealed my hair once during the week and felt that a light moisturizer (my DIY Spray Leave-In) was sufficient. I also noticed that I had less tangles than I normally would by the end of the week (winning!) I did two styles for the my Twist and Tuck Donut Bun (days 1 – 3) and my new Pinned up “Flat twist” AKA Seahorse (I shall explain below).

What Did I do?

  • To start the week I had washed, Deep Conditioned, moisturized and sealed before twisting my hair into 5  chunky twists.
  • Day 1 – After taking down the twists I massaged my Castor Oil Mix on my scalp, hairline and used a dab on my ends. I put my hair in my first hairstyle: Twist and Tuck Donut Bun.
  • Day 3 – I reapplied my Castor Oil mix to my scalp, hairline, ends and decided to accessorize the Bun with my DIY floral hairband.
Twist and tuck donut bun

Twist and Tuck Donut Bun (added accessory)

  • Day 4 – I moisturized my hair with my DIY Spray Leave-In Conditioner and sealed  with Almond Oil. I then put my hair into my second hair style the (Pinned up “Flat twist”) that I kept for the remainder of the week. I don’t know if people would call it a flat twist because to me it looked like a seahorse before pinning. Side note*: Flat twists and I do not get along at all! I suck at them but I did try and so far this is the best I have ever done!
Pinned up flat twist

Pinned up flat twist

This is the seahorse “flat twist” before I used one bobby pin to tuck away the ends

Flat twist aka Seahorse

“Flat Twist” aka Seahorse

  • Day 6 – I took down the flat twist, massaged my scalp, hairline and ends with the Castor Oil mix and redid the flat twist again.
  • Day 7 – Wash day routine and then got my hair ready to be set for week 3 (this week).

Castor Oil Challenge:

 I used the oil 3 times last week and actually want to increase it to 4 times. Eventually I might  even increase it (but we shall see I don’t want to push it). I was always worried that my hair would be greasy and my scalp/pores clogged up but the mixed blend of Castor with Rose Infused Grapeseed Oil seems to be working out great. I have my recipe and a video of the mixing process here.

My hair did not feel dry at any point during the week. I did re-moisturize my hair mid week just because that has been my habit but I only used my light leave-in so there was no worry of product build up, plus moisturizing is always a good idea. My roots felt so super soft, the ends were smooth and I think the Castor oil blend helped to avoid extra tangles. My individual strands basically glided across each other instead of wrapping, trapping and clinging onto one another. Overall I am loving this challenge!

Here’s to week 3!

What do you think of my Protective challenge styles? Do you like my Castor oil blend? I would love to hear how you use castor oil.

Thanks

Maicurls

Maicurls

Protective Style & Castor Oil Week 1 Update

Good Morning Maicurlies,

Protective style challenge 1st weekIt has been a week since I started the Protective Style and Castor Oil Challenge setup in Napturally Curly.com’s forum.

How did my first week go?

It went really well! I enjoyed the fact that I didn’t have to do too much with my hair in the morning. I literally just fixed the top of my hair (I slept with a satin scarf which sort of helped keep down fly-aways). “Fixing” didn’t take long and I was out the door. My roots felt super soft and I only moisturized my hair 2 times the whole week.

What Did I do?

  • I washed my hair the day before the challenge started (which was the 21st September), moisturized, sealed and then let it air dry in twists.
  • Day 1 – First hairstly: After taking down the twists I massaged a little of my mixed Castor/Rose Infused Grapeseed Oil with Peppermint on my scalp, hairline and a  tiny bit to my ends. This is the style I did for the first 3 days.
1st style

I put my hair in a ponytail, made about 8 twists, wrapped them around to make a bun and held it in place with bobby pins.

  • Day 3 – I reapplied some castor oil mix to my scalp and hairline.
  • Day4 – I re-moisturized my hair with my leave-in conditioner, again massaged my scalp and hairline with the castor mix and also put a dab on my ends and changed my hair style to this:
I put my hair in a ponytail and then rolled my ends up and under towards my head. Using bobby pins I keep my ends tucked underneath.

I put my hair in a ponytail and rolled my ends up and under – towards my head. Using bobby pins I kept my ends tucked underneath and used a ribbon for a little added color.

  • Day 7 (yesterday) – Washed my hair and did a henna gloss;

I put my hair in twists to air dry, pinned them down for the night and will be styling my hair for the next 3 days!

Looking forward to the new week ahead!

Thanks

Maicurls

Maicurls

Protective Style & Castor Oil Challenge (Sept – Nov)

Hey Maicurlies,

Protective Style & Castor Oil ChallengeAs I write this I am bouncing around in my seat! So as the title says, I am going to be doing a protective style and castor oil challenge from September 21st – November 2nd with a few lovely ladies on the Napturally Curly (forum). This is my first proper challenge and I am uber excited!

I have previously mentioned that I am a member on Napturally Curly which is run by the beautiful Naturallista Lisa (I have linked both her Site and YouTube Channel for your reference). After going through her site, following her on YouTube (of course), join the forum! Even if you are not interested in taking part in the challenge there are a lot of fantastic women on there to share ideas, learn from one another and just discuss EVERYTHING (none hair related too!)

If you do want to join the challenge it is never too late. You can also opt to just join one part of the challenge, all up to you!

So back to the challenge, we have a forum member who has always been on top of all the challenges agreed upon by the group. I am not sure if she would mind me mentioning her name here as she also reads my blog so I will just say Thank You hun (you know who you are :D) She deserves a shout-out for all the effort she puts into organizing the challenges, providing us with style inspiration and motivating words!

In case you are curious about the guidelines for the challenge here they are:

Protective Styling Challenge

  1. You will wear your hair in a Protective Style for no less than 2 days of each week of the challenge. (Some of us are installing twists, braids using weaves, wigs etc).
  2. Please post pics of your hair throughout the duration of the challenge, it would be great to see not just all of the styles you come up with but also any and all length that you gain, improvement to the health of your hair and even see how your styling progresses and your aesthetic changes.
  3. Each week you will answer several questions about your progress or setbacks from the previous week and so forth.

Castor Oil Challenge

  1. You will use choose how many days (between 3-7 days each week) and the way you will use your Castor Oil. You are free to choose the type of Castor Oil and how you will apply it to your scalp and or hair. (Some of us are diluting the castor oil a little with another oil)
  2. Don’t beat yourself up if you forget to use your oil each of the days you originally set for yourself, if this isn’t something that you normally do then you are creating a new habit.
  3. Just as we will check in on a weekly basis for the Protective Style Challenge we will do the same for this challenge.

My Challenge tactic:

First off I am going to trim my hair between today (19th) and the 21st September. I want to start off “fresh” so a trim is in order. I will be taking off more hair at the back since this is were I have the most uneven length difference to the rest of my hair and then lightly dusting the rest to get rid of SSK’s.

  • I will be doing low manipulation/protective styles but not in the sense of using extensions, additional hair, wigs or weaves. Things like twist and tucks, buns, jumbo twists, medium two strand twists with my hair tucked away will be the styles I’ll use.
  • I plan on trying to keep my hair in styles for at least 3 days (touch-up my roots when needed) and will take my hair down to re-moisturize and then put it away again.
  • I will wash my hair once a week (as normal) which will include DC’s.
  • I also plan to do henna glosses at least 3 times during the challenge.
  • I will be using a mix of castor oil and infused rose oil (in a couple of weeks my combination of Ayurvedic infused oil will be complete and I will be using that). Castor oil is just too heavy for me so I will dilute it 70% castor to 30% other oil.
  • I will apply the oil 3 times a week to my roots/scalp, hair line and a tiny bit on the ends of my hair.

The purpose of me taking part in the challenge is to help thicken up my hair and for overall healthy hair. I want to retain length (if I see growth that is of course a plus) but my goal is to help boost my hair line which is quite fragile and has always been thin, even as a child. (I will write a little more about my hair line in another post). I also need more practice at simple low manipulation styles so this will be a great opportunity.

I will be taking photos during the course of the challenge of my hair styles and will also do a measurement check after I have trimmed my hair to compare to the end results in November.

I am so excited to get started and hopefully see positive results!

Are you currently doing or planning to do a protective style or castor oil challenge? If so what are you doing, I would love to hear from you!

Thanks

Maicurls

Maicurls

Twist and Tuck Donut Bun

Hello Maicurlies,

I figured it was time to do a other styling tutorial seeing as I have been on a DIY and experiment frenzy as of late. This is my Twist and Tuck Donut Bun.


Twist and Tuck Donut Bun

                                         Twist and Tuck Donut Bun

I love this bun because it is oh so easy to do, really quick and more importantly it is a protective style. Apart from being a protective style it does not require a lot of manipulation and if you do not make it too tight you can actually just cover your hair at night with a scarf, take down the scarf in the morning , touch up the edges (if you wish) and you are good to go!

I have a video of how I do my Twist and Tuck Donut Bun on YouTube.

I also have an written explanation below of how I achieve this bun:

Products/Tools Used:

  • Plain water spray bottle
  • DIY Creamy Leave-In Conditioner
  • Donut*
  • Ouchless Hair bubble
  • Soft Bristle Brush
  • Stretchy Headband
  • Bobby pin (you might need more than one depending on your hair)

*I modify my Donut which I bought from H&M because I do not like the texture of it as my hair gets stuck it in. To protect my hair I cut off the toe part of a stocking (best to get a fresh stocking for this). I slip the stocking in the gap of the Donut, pull the edges over the Donut, cut off the excess and that is it. (See below)

Modified Donut

Tutorial 

I have explained how I achieve this style along with images and text below. 

Thanks

Maicurls

Maicurls

Accessorizing My Hair – Video on YouTube

Good Evening Maicurlies,

I am trying to get my act together and record more videos/write more posts (I am sorry I have been M.I.A I will do better!)

I do have a few things lined up so to get the ball rolling I made a video on how I use ribbons to accessorize. I already made a short post about the ribbons I bought (with the intention of using them on some dresses) but  never explained how I “dress up” a simple chunky twist:

Twist without Ribbon

Like this:

Twist with Ribbon

It really is a simple style and does not require a lot of explanation but I always “learn” by seeing and doing so I figured why not record a video right? As always I have the video up on my YouTube Channel and here on my Blog’s Video Page. I will write a quick post on the step by step process as well.

Do you use ribbons to accessorize? I would love to hear from you! 

Thanks

Maicurls

Maicurls

Ribbons as a Hair Accessory

Hi Maicurlies,

DSC05334

I bought a couple of ribbons the other day because I had initially wanted to use them to accessorize a few dresses. I then got to thinking what about using them for my hair!  

CIMG3992CIMG3995CIMG4007

To do the above:

  • I just put my hair in a big chunky two strand twist
  • Secured the twist with two hair bubbles; one at the base the other at the end
  • Took a strip of my ribbon and placed it over the base of my twist wrapping it around once
  • Then crisscrossed the ribbons down the length of my twist
  • The ends were tied over the hair bubble

I do not know about you but I really like how the ribbon can make a simple big twist look a little more “chic”. Well actually, I do not know if “chic” is really the right word but I feel that it makes a difference in the appearance of a twist. I have red, white and black ribbons two different sizes (I might have to go back and get the super thin ones as well!)

I also plan on using the bigger ribbon as a “head band” to cause some distraction from my forehead :D! So it will be “play with ribbon time” :). 

Thanks

Maicurls

Maicurls

Buns…buns…buns

Hello Maicurlies,

It has been a while! I am in the middle of making new orders for butters and I am super excited! I have so many ideas! Hair Creams and hair puddings and body creams… OH MY! 😀

So once all that is sorted I will of course have videos and write-ups. Now, I have finally yes finally, written up the three different buns I currently do with my hair. I had originally wanted to put all three methods under one page “Buns”. But I realized that it would be too long and confusing. Instead of having each write-up listed one behind the other, I have linked each bun to individual pages and all of the links are located here

I also have the videos up both on my YouTube Channel and on my Videos page in the Blog. 

Keeping a Hair Journal

Hi Maicurlies,

A New Year brings new missions, plans, goals and so on! This of course is not only true for our professional, personal and day to day lives but some of us also have goals for our hair! I will be touching upon the “Hair – side of things”!  

One of the most resourceful way to measure, record and monitor your goals is to write it down in a Journal. Now with the “Digital Age” you can of course use a Digital Journal. I personally prefer to physically use pen and paper (I guess I am “Old School”.) Now, when it comes to what to write in the journal I say EVERYTHING! 

I recently joined a Natural Hair Forum (which I have previously mentioned) Napturallycurly.com Hair Forum and in there I spoke with a few of the lovely ladies and checked what they note down in their Hair Journals. It was great to share ideas because they brought to light some points that I seemed to have missed. So together with a few of the ideas I had and some of the suggestions I got, I have made a little list of things you can note down in your journal (these are just suggestions!)

Routines

You can map out the kind of routines you do/want to do e.g. when you want to pre-poo, Shampoo, deep condition, Co-wash etc. You can not down the products/ingredients you used, how your hair felt afterwards, how long it was been treatments etc. 
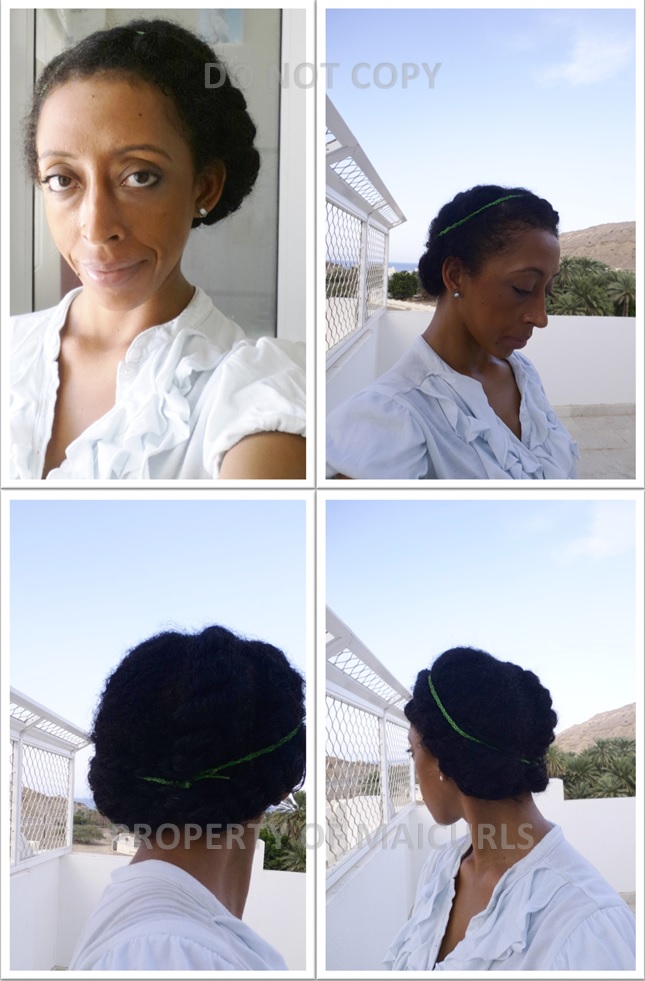
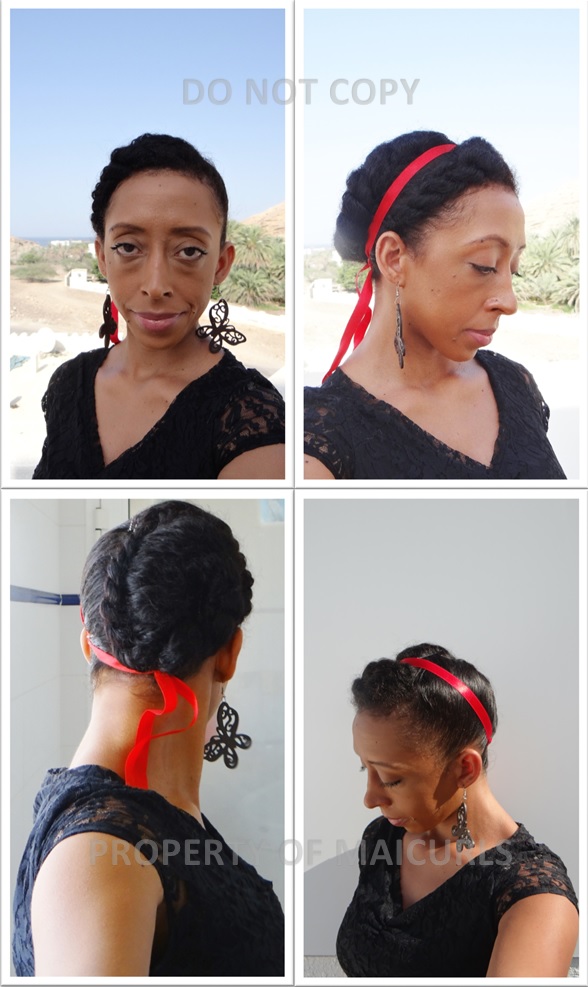
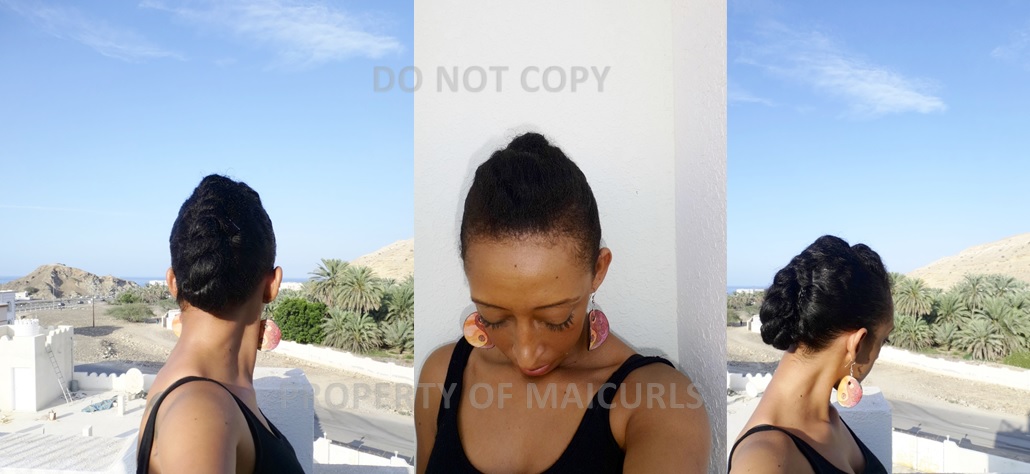
Hair Styles

In this category you can note down what hair styles you have tried and how they worked out for you. Included in here you can also write what products you used, how your hair was when you styled it (e.g. wet, damp, dry), how you set it (e.g. air dry, hooded dryer, hair dryer). You can also note down future planned styles you want to try out. 

Untitled

Products/ Mixes

For this section you can note down any new products you have had your eyes on or new recipes you want  to mix. When it comes to recipes you should write down the ratios of each ingredient used, how you mixed it and how you applied it. At the same time I think it is just as important to record what worked or did not work. This way you save yourself (and your hair) have repeating a mishap or forgetting about a product/mix that your hair loved. Same as before you should note down how your hair felt, the process you used, how long you left it in, did you use direct heat or not, did you warm up the product/mixture etc.
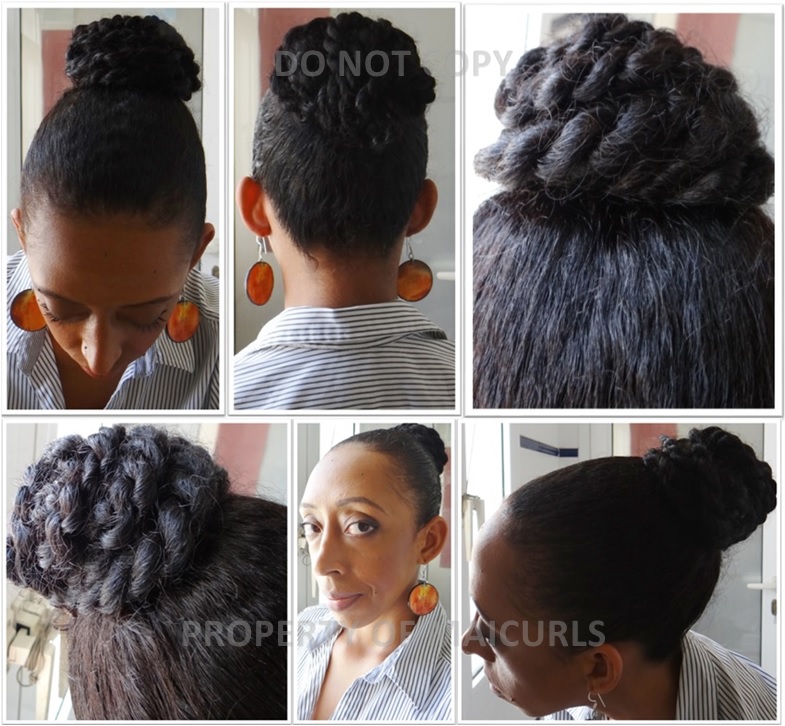
Photos

Now when it comes to psychically writing in a journal it might not always be convenient to print out photos and stick them in the journal (although I LOVE the idea of that!) So what you can do is, have a folder on your computer dedicated to your hair journal which is ONLY used to document your hair progress. You can have a section for before/after Deep Conditioning, new product before/after results, new DIY mixes before/after results, tracking your growth, new hair style results etc. TIP: What I plan on doing for measuring my hair’s health and growth is to actually choose one hair style as my “staple monitoring” hair style. For example if I choose a Wash-n-Go to be the staple examining style I would take photos of my hair when I do a Wash-n-Go every month/two months and then track how my hair looks (in terms of health, shine)  its density (thickness.) and its growth. This way I have a more reliable measurement instead comparing stretched to un-stretched hair or puffy versus “un-puffy” hair. You might even go as far as to use the same product, wash routine etc. when monitoring the results.

oils

Challenges

Challenges are always fun to do (you might get a bigger kick out of it if you involve others as well.) So you can forum a group (or on your own) challenge yourself to do more protective styles, moisturize your hair more frequently, reduce heat, completely stop using heat etc. For example: write it down, note how you felt on the day when you would normally flat iron your hair,  and what you did to overcome the urge to use heat. Having it noted down somewhere might make you feel a little more accountable to go through with it! 

Short Term Goals

In here you can include when you plan on cutting/trimming your ends. You might also plan on dying your hair for a special occasion and you can plan and prep your hair for the event. Straightening your hair might also be on your plan (if you are not already using heat more frequently) so again you can plan and prep your hair for the special occasion. Note down the same as above: how you prepped, what you used and how your hair felt afterwards.

Long Term Goals

Now when it comes to long term goals this really is a personal thing. Some of us might want bra strap length hair, mid back length or longer! For some, your long term goal may be to use only organic products throughout the year. You might have a date picked out when you want you hair to be xx cm. If you integrated a new routine into your hair care then you long term goal might be to compare how your hair felt and looked one year ago compared to now and you will be in a better position to see if the new routine worked for you or not. You get to really determine/measure the results if you have recorded your progress every step of the way.

Final Tips

There are a few tips I think you should consider when you start to map out your goals.

KEEP IT REALISTIC (most important!) If you are starting out with a Tiny Weeny Afro (TWA) it might not be realistic to say “By the end of the year I want Hair reaching my B**T.” There is nothing wrong in wanting something however, if you setup goals that you KNOW are unrealistic, you might end up being disappointed or unmotivated if they do not turn out the way you want.

KEEP IT SIMPLE. For example: if you want to try out more protective styles saying “I want to try out a new hairstyle three times a week” might not be effective. Having conflicting goals e.g. trying to do more protective/less manipulative styles might not work out if you are constantly changing your hair style during the week.

DO YOUR RESEARCH. If you are working with a budget you might & should not go spending all your money on the ‘most expensive products’ just because you think that is what you have to do! There is so much information online! Do your research, experiment, read reviews, and ask questions. There is always an alternative out there, you just need to do a little homework!

DO NOT GIVE UP. It can be a hassle at times (believe me I know!) But you can not give up just because it is “hard.” Life in general is not easy and most of the time you need to push through to get what you want, but the rewards really are worth it! If you are stuck in a rut or think you can not make it, take a breath and relax. Keep in mind that you are NOT the only one going through this or struggling. Sometimes just looking at pictures, reading peoples stories, communicating with other can be just the thing you need, so do not give up! 

Ok so I wrote a book and will end it here by saying I am ALWAYS happy to answer any questions, discuss topics and share whatever I know so in case someone wants a shoulder to lean on (mine is free!)Good luck on whatever journey you might be on this year and remember you are not alone!

Thanks

Maicurls

Maicurls

Over The Last 4 Years… Transitioning to Natural

Hi Maicurlies,

From my Transition to my Natural Curls

From my Transition to my Natural Curls

Last night I was reminiscing by going through photos of my friends, family and I and started going as far back as the year 2000! As I was going through the photos I kept on cringing the further back I went…why you ask? Well apart from some of my “fashion sense” which were questionable and cringe worthy at times… I noticed how my hair looked! Now I really do not know if at the time I was living in my own little bubble (I do remember not liking my hair at all) but I never seemed to be at the point where I wanted to hide indoors because of my hair. Although looking back now I maybe should have! Anyways so I was clicking through photos and decided to collect a few of them to make a sort of “montage of time” (I miss developing actual photos…technology!) 

I simply did this in the hopes that it might help motivate someone out there that is considering going natural, transitioning, recently Big Chopped or Newly Natural (perhaps even already Natural!) It is funny looking back at how my hair has changed since going natural. Apart from the obvious drastic improvement after I stopped using relaxers and actually taking care of my hair I notice a change from when I finally stopped using chemical dyes. I was a dye FREAK! I went through colors like people change clothes! It did have its toll on my hair which is why I personally choose to stop. Anyways ladies I think the pictures summarize what I am trying to say :)! 

So if anyone is reading this and is in need of a little inspiration…I hope this will be a form of comfort. I started out with what I now call a bit of dry, brittle, fragile, thin and strangely colored straw-like hair (after my last relaxer and transition) to what I proudly call Maicurlz!!! 😀

I have posted the same picture in a new page under the “Mai Hair Journey” Tab called – ‘(2009 – 2013) Summary Look’ but added some details of each row. 

I would LOVE to hear from you! What has your experience been? Have you gone through photos too? Are you considering going natural? Transitioning? Big Chopping for 2014? Let me know! 

Thanks

Maicurls

Maicurls