So today I wanted to share my current obsession (actually I have yet another new one already) Pin Curls!
Let me tell you, I LOVE pin curls!!!!
What do I love about Pin Curls?
EVERYTHING! Since I have fine natural hair I tend to look for styles to helps to give me volume and the illusion of more density and pin curls give me that….they give me life! Generally I normally like to style on dry hair or slightly damp hair because I get more volume if my hair is not really wet but with pin curls regardless of whether I start on freshly washed hair or dry hair I adore the results! In my demo I did medium sized pin curls on freshly washed hair which gave me medium curls with bounce but they can be made smaller for tighter results or bigger for looser curls.
My styling process (especially when I start on wet hair) is to
Set the Pin Curls
Allow them to air dry
Cover with a silk/satin scarf overnight
Take down the bobby pins, separate the curls and style my hair (the following day)
Pin curled hair
Curls taken down, fluffed and styled
However, there are times when I have to go out after setting my hair (example on the day when I recorded my video) so on those days I do my faux huge headwrap.
No one knows my hair is curled up, pinned down and not in a big bun underneath and I don’t have to go out looking a little peculiar 😉 Then the following day I take down my hair and voila!
Here is my video of the process:
I would love to hear what you think! Do you do pin curls, would you try them?
It is yet again time for a Do It Yourself (DIY) because I of course do not share enough of these normally ;).
So as the name indicates today I have got a DIY Conditioning Cream recipe and surprise surprise the mix contains…….coconut cream!!! Jokes aside, apart from the Coconut Cream it also contains Flax Seeds, Fenugreek Seeds and two different types of infused carrier oils (coffee bean infused almond oil and coffee bean infused coconut oil) along with some Essential Oil at the end. Another additional ingredient is a moisturizing conditioner with can be added to the mix otherwise should be used after rinsing the mix from your hair (more details about this below). For now, let’s break down the ingredients and their benefits.
Flax Seeds:
Helps with hair growth due to the rich source of vitamin E.
Due to the Vitamin E oil it is said to help slow down premature grey hairs.
Contains Omega-3 fatty acids which helps provide the hair with strength and elasticity.
Helps fight hair loss (excessive shedding).
Can help ease scalp irritations such as dryness and dandruff.
Nourishes the hair roots, shaft, and the scalp.
Fenugreek Seeds (aka Methi):
(Tip: Fenugreek is a popular ingredient in Asian dishes (mainly India) so in case you can’t find the seeds in your local supermarket/grocery store – (the “ethnic” isle) check your local Indian markets you will be able to find them there).
Aids in hair growth thanks to the proteins and nicotinic acid
Provides strength to the hair thanks to lecithin
Provides moisture to the hair
Helps fight dandruff
Soothes an irritated scalp
Conditions the hair
Coconut Cream*:
Helps to sooth scalp irritations
Penetrates the hair strands
Provides the hair with luster & shine
Provides strength to the hair
Enforces hair growth
Reduces hair shedding
Reduces hair breakage
Makes the hair soft
Said to help slow down premature grey hairs
*NOTE: Due to the presence of protein in coconut cream some of you might find that it makes your hair feel hard. It is recommended that if you do not use a moisturizing conditioner as part of the mix that you rinse your hair with a moisturizing conditioner after you rinse your hair.
Oils:
I use coffee based oils since it has a whole number of benefits e.g stimulates blood flow therefore growth in the hair, helps keep the scalp clean, provides luster to the hair, provides shine, helps to subtly darken the hair and so much more. I have a lot of details about coffee infused oil herebut you can use any oil of choice.
Products/Tools Used:
2 oz Flaxseeds
2 oz Fenugreek Seeds
8 oz water (used the night before to soak the seeds)
7 oz coconut cream
0.2 oz Coffee Bean Infused Almond Oil
0.5 oz Coffee Bean Infused Coconut Oil
7 oz water (to boil the seeds) – Optional – Essential Oil (after the mix cools) – Optional – 2 – 3 tablespoons Rinse out conditioner
Pot
Sieve
Bowl/container
Spoon
Gloves (optional to keep things sanitized)
Squeeze bottle (clean and disinfected)
Funnel (to pour the mix into your squeeze bottle)
Method:
Before I begin the recipe I first soak the seeds in 8oz of plain water overnight (you can choose to soak them for less time or skip this all together). Boil the seeds in 7oz of plain water on low heat just until it starts a rolling boil (string the whole time). Pour the liquid through a strainer and reserve the seeds (they can be stored and reused later if kept in the freezer). Rinse out the pot and warm up the coconut cream just till it starts to thicken (no more than 3 – 5 minutes). Add the warm coconut cream to the liquid and stir thoroughly. (If you choose to add conditioner to the mix directly, do so now) then add the oils, stir and pour into the container. Once the mix cools you can add Essential oil (optional).
Instead of adding the conditioner to the mix I like to use it after I have rinsed my hair and the water runs clear. I do this because I am not the biggest fan of the scent of Fenugreek seeds. Some have said that they get a “maple syrup” scent when they use Fenugreek seeds, I get no such smell! To me the seeds have a spice scent that I am not a fan of but that is way I add essential oil (usually peppermint) once the mix cools and then do a final rinse with conditioner.If you use conditioner in the recipe this will give your mix additional slip and that will help detangle the hair even further.
Application/Rinse:
Apply the mix to freshly washed, clean and detangled hair going from the ends to your roots. Use your fingers to gently “finger comb” and distribute the mix, cover with a shower cap and let it sit for 10 – 15 minutes and rinse your hair using warm water. If you feel like you need to follow up with a moisturizing conditioner do so after the water runs clear.
You should be left with hair the feels stronger but not dry, shiny but not sticky, basically your hair should be feeling happy!
NOTE: If you have any leftover conditioning cream you can store it in your freezer for future use (I always have some left over). You also can freeze your coconut cream in case you don’t use the rest for cooking – it is delicious in curries btw ;).
I would love to hear if you have ever used Fenugreek seeds before. If you have, please let me know if you get that “maple syrup” scent from your seeds.
Today I wanted to share another updated recipe: my Protein Hibiscus Flaxseed Gel (FSG).
Protein Hibiscus Flax Seed Gel (FSG)
This is an updated mix from my previous recipes (here) and (here). There are a few similarities but the major difference is the addition of Gelatine (the protein) and Hibiscus Petals.
Those that have protein sensitive hair might think you need to skip this recipe however, it can be modified since the protein is an optional ingredient. I have been using this recipe for a while now since I have fine hair strands and protein gives the hair strength and elasticity and that is what I need. A lot of the times we are very diligent on making sure we moisturize our hair, use moisturizing based products, deep condition etc but sometimes forget that we still do require some protein in our routine. So if you feel that your hair is weak, if you are going through some chemical or heat damage or if you have fine and fragile hair strands and are only using moisturizing products then you might want to switch to a protein gel from time to time when it comes to styling your hair. Make sure to switch between the protein gel and non protein gel so you do not get a protein overload and whenever you are using a protein gel, ensure that you are using a moisturizing leave-in conditioner.
Now another point I want to make is that I like to use hibiscus since my hair loves ayurvedic herbs but please keep in mind: not to wear your favorite light top while setting your hair with the gel since hibiscus does give the gel a red/purple tone which could potentially stain your top while you hair is wet and touching it. Once you hair dries the colour will not rub off it is just while setting/as your hair dries. Since it does give a red/purple tint to the gel it could potentially do the same to the hair of those that have blond/light/bleached hair. If this is something you want to avoid then please avoiding adding hibiscus, those with dark hair will not really notice a major colour difference.
Ingredients/tools used:
Protein Hibiscus Flax Seed Gel (FSG)
12 oz Water (bottled water)
2 oz Rose water (Optional – not really required, can be replaced with plain water but a good addition)
2.5 oz Flax Seeds (this makes a thick gel – use less for a thinner gel)
Roughly 0.2 oz hibiscus petals (optional)
0.2 oz Gelatine (protein optional – those with protein sensitive hair will want to skip it)
5 drop Grapefruit Essential Oil (you can use any Essential Oil or none at all)*
3 Capsules vitamin E oil – roughly 0.15 oz
Non Stick Pot
Spoon/spatula
Sieve
Disinfected container (squeeze/pump bottle is best)
*If you are pregnant do not use any essential oil.
Alternatives:
Rose Water can be replaced with regular water if you do not have any however, rose water does have its own nourishing properties (read here). If you do not want to use Hibiscus it can be skipped all together otherwise you could also use dried rose petals. Glycerine is a humectant that does not always play nice with peoples hair therefore, it can be skipped all together otherwise you can replace it with honey or agave nectar which also are humectants. (Humectants provide the hair with moisture from the air (humidity) however, it always depends on the weather conditions in the area where you live). If you have too much humidity it can cause frizz and if you do not have enough humidity in the air the results can be the opposite; drawing moisture from the hair outwards to the air which causes driness. Aloe Vera Juice can also be added to the mix if you have any on hand for its moisturizing properties. If you prefer your gel to be thinner either add more water e.g. 13 – 14 oz or reduce the amount of flax seeds use e.g. 1 – 1.5 oz.
Mixing Method:
1. I first warm up the water and rose water together in a pot, once it starts to lightly warm up I throw in the flax seeds and begin to stir. 2. After about 5 – 7 minutes of the liquids and flax seeds have started to boil I throw in the hibiscus petals and let that boil for a further 5 – 7 minutes while continuing to stir (you must stay by the pot the whole time and continue to stir). As the hibiscus boils you will notice the colour of the gel starts to change and as it boils the liquid starts to become thicker. 3. Depending on how thick you want your gel, remove it from the stove (the longer on the stove the thicker the gel) and immediately pour it through a sieve. (As soon as the seeds are out of the pot be sure to cover the pot with water to help with the clean up). 4. I squeeze out any excess gel from the seeds with a spoon/spatula and then transfer the seeds into a container. Let the seeds cool down before covering with an airtight lid and storing it in the freezer to be reused next time. 5. Let the gel cool down a little (it should still be warm) before adding the gelatine (skip if not making a protein gel). 6. I sprinkle half the gelatine evenly over the top of the gel and begin to stir then add the remaining and repeat. 7. I use an electric whisk to help breakup any lumps and clumps and also to help loosen the gel a little (otherwise it can become really thick and “jello- like” once it cools). 8. Let the gel completely cool down before adding the oils otherwise the heat will destroy their properties. I add the Coffee Infused Oil, Essential Oil, Vitamin E Oil and the Glycerine (optional) and stir before pouring it into a clean & disinfected pump container.
Storage:
FSG has a short shelf life so it is essential to store it in the fridge whenever it is not being used! It generally will be go for 2 weeks 3 weeks maximum however, you can save some of your gel if you know it won’t be used up before it goes bad by pouring some into ice-cube trays in the freezer. Put the gel ice-blocks in a sandwich bag and remove some cubes whenever you need some gel.
Benefits:
Protein Hibiscus Flax Seed Gel (FSG)
So while I have previously written about all the nourishing benefits of FSG (yes this gel actually has more than the ability of giving your hair some hold) I will quickly jot down some of the benefits of FSG in general along with the benefits of a protein FSG:
Its rich source of vitamin E holds the power to help with hair growth.
Provides the hair with shine.
It contains moisturizing elements (along with the additional moisturizing ingredients added) helps keep the hair moisturized.
Provides nourishment to the hair roots, shaft, and the scalp.
Gives the hair a light hold that is not crunchy or flakely
Helps smooth the hairs cuticle
Said to help prevent early hair discolouration thanks to the Vitamin E in the flax seeds.
Contains Omega-3 fatty acid that helps nourish the hair follicles.
Provides additional elasticity thanks to the Omega-3 fatty acid.
The addition of protein provides the hair with strength especially for those with fine/chemically damage/heat damaged hair.
The addition of protein also helps reestablish the elasticity of the hair (when you use a moisturizing leave-in and follow up with a protein gel).
This is the “how to” video:
I would love to hear what you think of this recipe. If you try the protein version (or skip it) I would really like to hear how it worked for you.
I have mentioned the benefits of Rosewater for Hair and Skin and in honor of Rosewater (which I LOVE) I have been experimenting. What did I do? Rosewater Infused Flaxseed Gel (FSG)! Verdict? I LOVE it!
Apart from that delicious Rose smell I love the moisturizing effects I get from the gel. I normally make FSG with either plain distilled water or distilled water and Aloe Vera Juice (AVJ) and my hair does feel moisturized from it but the Rosewater seems to give it that edge!
So after weeks of experimenting (I have to do trail and error for a few weeks before I announce anything) I can say I absolute love incorporating Rosewater to my gel!
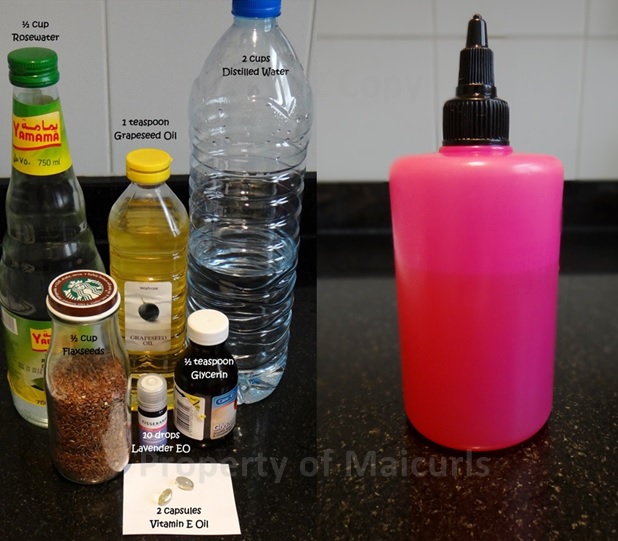
This is the recipe I use:
2 cups of Distilled Plain Water
1/2 cup Rosewater
1/2 cup Flax Seeds – (use less seeds if you want a thinner gel)
1 teaspoon Grapeseed oil (use any carrier oil of choice)
1/2 teaspoon Glycerin (optional – not everyone hair likes Glycerin)
10 drops Lavender Essential Oil (use any EO of choice)
I manage to get 3/4 cup of thick FSG with this recipe. If you do not like your Gel to be thick you can use less flaxseeds. While the Gel is thick I do not get any flaking or crunch (if I use too much gel and my hair does feel a little “stiff” it goes away once I scrunch my hair.)
I have a video demonstrating how I make my Rosewater Infused Flaxseed Gel on YouTube and as always have linked it here on my Video Page. I also have my “original” FSG recipe listed on my Blog here. I love experimenting so I am sure that Rosewater Infused Flaxseed Gel will not be my last experiment but I must say this is going to be my staple.
Have you used Rosewater in your FSG? If so, what is your recipe and how does yout hair respond to it? If not, how do you make your DIY Gel?