Hello Maicurlies,
I have come back with ANOTHER DIY!!!
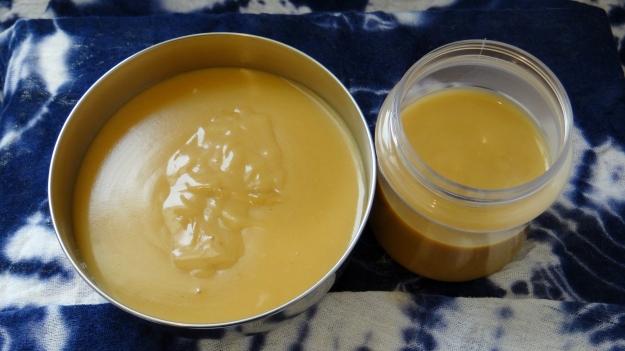
DIY Caramel Hair Softener from “Hair Care Rehab” – Audrey Davis Sivasothy
I can not take credit for this gorgeous, delicious, luscious looking DIY recipe though, all credit goes to the talented author and Naturalista Audrey Davis Sivasothy and her wonderful book Hair Care Rehab. You can read all about how much I love this book in my review here.
I contacted Audrey to check if it would be alright for me to use her recipe in a “how to” video/blog post and she was happy for me to share, so here it is! And Thank You Audrey!!!
According to the book (and my own personal experience) this recipe will:
- Soften & hydrate the hair
- Reduce Frizz
- Strengthen the hair
- Lengthen curls
- Improve curl definition
I also found it:
- Provides shine
- Reduces tangles
- Provides bounce
Now before I move on I will reiterate what the book says: you will want to do this on a day when you have “me time”, so I suggest doing this on a “pamper day” when you know you will not be rushed simply because for some of you after application you might want to follow up with shampoo and a quick Deep Condition (more about this further down).
Ingredients/Tools:

- 2 overripe Bananas (the more ripe they are the better)
- 4 oz Water
- 1 oz Lemon Juice (in the original recipe it mentions using 2 oz but I use less*)
- 2 oz Raw/Natural Honey
- 4 oz Maple Syrup or Molasses
- 2 oz Extra Virgin Olive Oil (EVOO)
- 1 oz Plain Flour
- Mixing container
- Blender
- Sieve
- Spoon
- Pot
*I use less Lemon Juice because it tends to be too acidic for my hair and can dry it out, I suggest for your first attempt using less than 2 oz and then increasing if you so please.
Ratio/Ingredient Alternatives:
- Replace Honey with Agave Nectar
- Use either Maple Syrup or Molasses
- Use any carrier oil you wish in place of the EVOO (e.g. Extra Virgin Coconut Oil, Grapeseed Oil, Almond Oil, Avocado Oil etc)
- Use Corn Flour in place of Plain Flour
- Baby Banana food in place of real bananas (I always find real bananas work better)
You can use half the ingredients mentioned to make less.
Mixing Instructions:
I first cut the bananas into 2 – 3 pieces and then blend them, you want to make sure they basically turn into banana “mushy juice”. (This is where using overripe bananas come into play because the more ripe they are the easier it will be to get a smooth mix without too many bits). Next I add the water and lemon juice and re-blend. After this I highly suggest using a sieve, this will help further eliminate banana bits (which are so difficult to get out of curly/kinky hair). You then can add the honey, maple syrup, EVOO and stir. The last ingredient is the flour which, should be done in halves and blended in between to make sure it is lump free.
The last step is warming up the mix. You only want to lightly warm it up, NOT boil it! The warming up will only take a few minutes and as soon as this happens you will notice the mixture thickening. Turn off the stove as soon as you notice the thickening otherwise you will be left with a lumpy and thick hard to use mix.
Application:
You must allow the recipe to cool down to room temperature before you apply (please do not burn your fingers or scalp!) I prefer to apply onto damp hair (doesn’t have to be freshly washed) and then cover with a shower cap, plastic bag and scarf for 1.5 hours (you can leave it on for 45 minutes – 1.5 hours no more time is required). I normally only follow up with a conditioner to rinse my hair and then move onto styling without the need to Shampoo or do an Apple Cider Vinegar (ACV) rinse or a Deep Conditioner.
Of course I have a video of my mixing process:
Things to keep in mind:
- This is NOT a temporary relaxer! I have seen a few videos/blog stating that the caramel treatment works as a “mild/temporary relaxer” for the hair….I don’t know how one could come up with that but NO! The recipe provides the hair with so much moisture and nourishment that dry hair (at least my dry hair) basically absorbs all that goodness which ends up making my curls “heavy” (for lack of a better word). This heaviness makes my curls appear longer which I guess is why some people claim it is a “temporary relaxer” but again NO, it just leaves your hair not dry!
- If you can know you will not be able to use all the mix in one go either use less of the ingredients, give some away or as a last resort store the remaining in your freezer. Do not leave it in your fridge for more than a few days because it will go moldy!
- If you store it in your freezer, I suggest gently double broiling in a heat proof glass bowl over water since it will become really thick and almost impossible to manipulate onto your hair once it has been frozen.
- Some of you might feel the need to follow up with shampoo afterwards or perhaps an ACV rinse. If you use shampoo then you might consider doing a quick 10 minute deep condition just to make sure your hair doesn’t feel stripped because of the shampoo.
- If you are allergic to ANY of the ingredients please DO NOT USE THEM! There are always alternative ingredients, such as those mentioned above or other recipes you can use without risking your health.
- If any of the ingredients are new to your routine, please do a patch test before you apply it all over your hair, to avoid any unforeseen allergic reactions.
I would love to hear what you think if you give this a try, or if you already have used the Caramel Hair Softener please let me know what you thought!
Thanks
Maicurls

You know, if I was to bake this treatment, bet it would be yummy with Caramel Icing, your treatments are soo good girl, hair and to eat!!!!
Smilies!!!
LikeLike
MMM… looks good enough to eat. LOL! I can’t wait to try this. Thanks for sharing!
LikeLiked by 1 person
Hey gorgeous, thank you!
It really does turn out looking like something I would want to eat LOL. I hope your hair loves it! 🙂
LikeLiked by 1 person
Wow, awesome powerful recipe!!!!
Thanks for posting dear.
Smilies!!!!
LikeLiked by 1 person
Hey beautiful!
My hair realllllly loves it! You should give it a try (and let me know what you think) 😉 x
LikeLiked by 1 person
Ok sweets, although, you did say Caramel so before I use, more than likely, many times, will eat instead, hhahahaaha.
Smilies!!!!
LikeLike
Sounds great!
LikeLiked by 1 person
Hey hun,
My hair really does enjoy the treatment. If you give it a shot please do let me know how it turns out for you. 🙂
LikeLike